

Appearance
MCP for AI Agents
Managing a busy community takes time. With MCP for AI Agents, you can hand some of that work to an AI assistant such as Claude, Cursor, or Codex. Ask it in plain language to summarize new posts, reply to a member, pin an announcement, or draft a course outline, and it does the work inside your community.
MCP stands for Model Context Protocol. It is a standard way for AI apps to connect to a website. FluentCommunity includes it, so you can set up the connection from Portal Settings without extra tools or custom code.
This guide walks you through turning on MCP, connecting your AI app, and seeing what the assistant can do.
You stay in control
The AI acts as the WordPress user who connects it. It can only do what that user can do in the portal. Posts and comments it writes appear under that user's name. MCP is off by default, and you can switch it off at any time.
TIP
The core MCP server and its community, member, and course tools are in the free plugin. The moderation, enrollment, quiz, and insights tools need FluentCommunity Pro. See What your AI agent can do.
Requirements
You need:
- WordPress 6.9 or newer. The MCP server uses the WordPress Abilities API, which comes with 6.9.
- The FluentHub plugin. It provides the MCP adapter. Step 2 shows how to install it.
- HTTPS on your site. WordPress application passwords need it, and a security plugin can also turn them off.
- A site administrator account to turn MCP on.
Step 1: Enable MCP
- In your WordPress admin, open FluentCommunity and go to Portal Settings.
- Click MCP for AI Agents.
- Switch on Enable MCP for AI Agents.
Everything for MCP lives on this page: the toggle, the tool count, the endpoint URL, and the connection snippets.
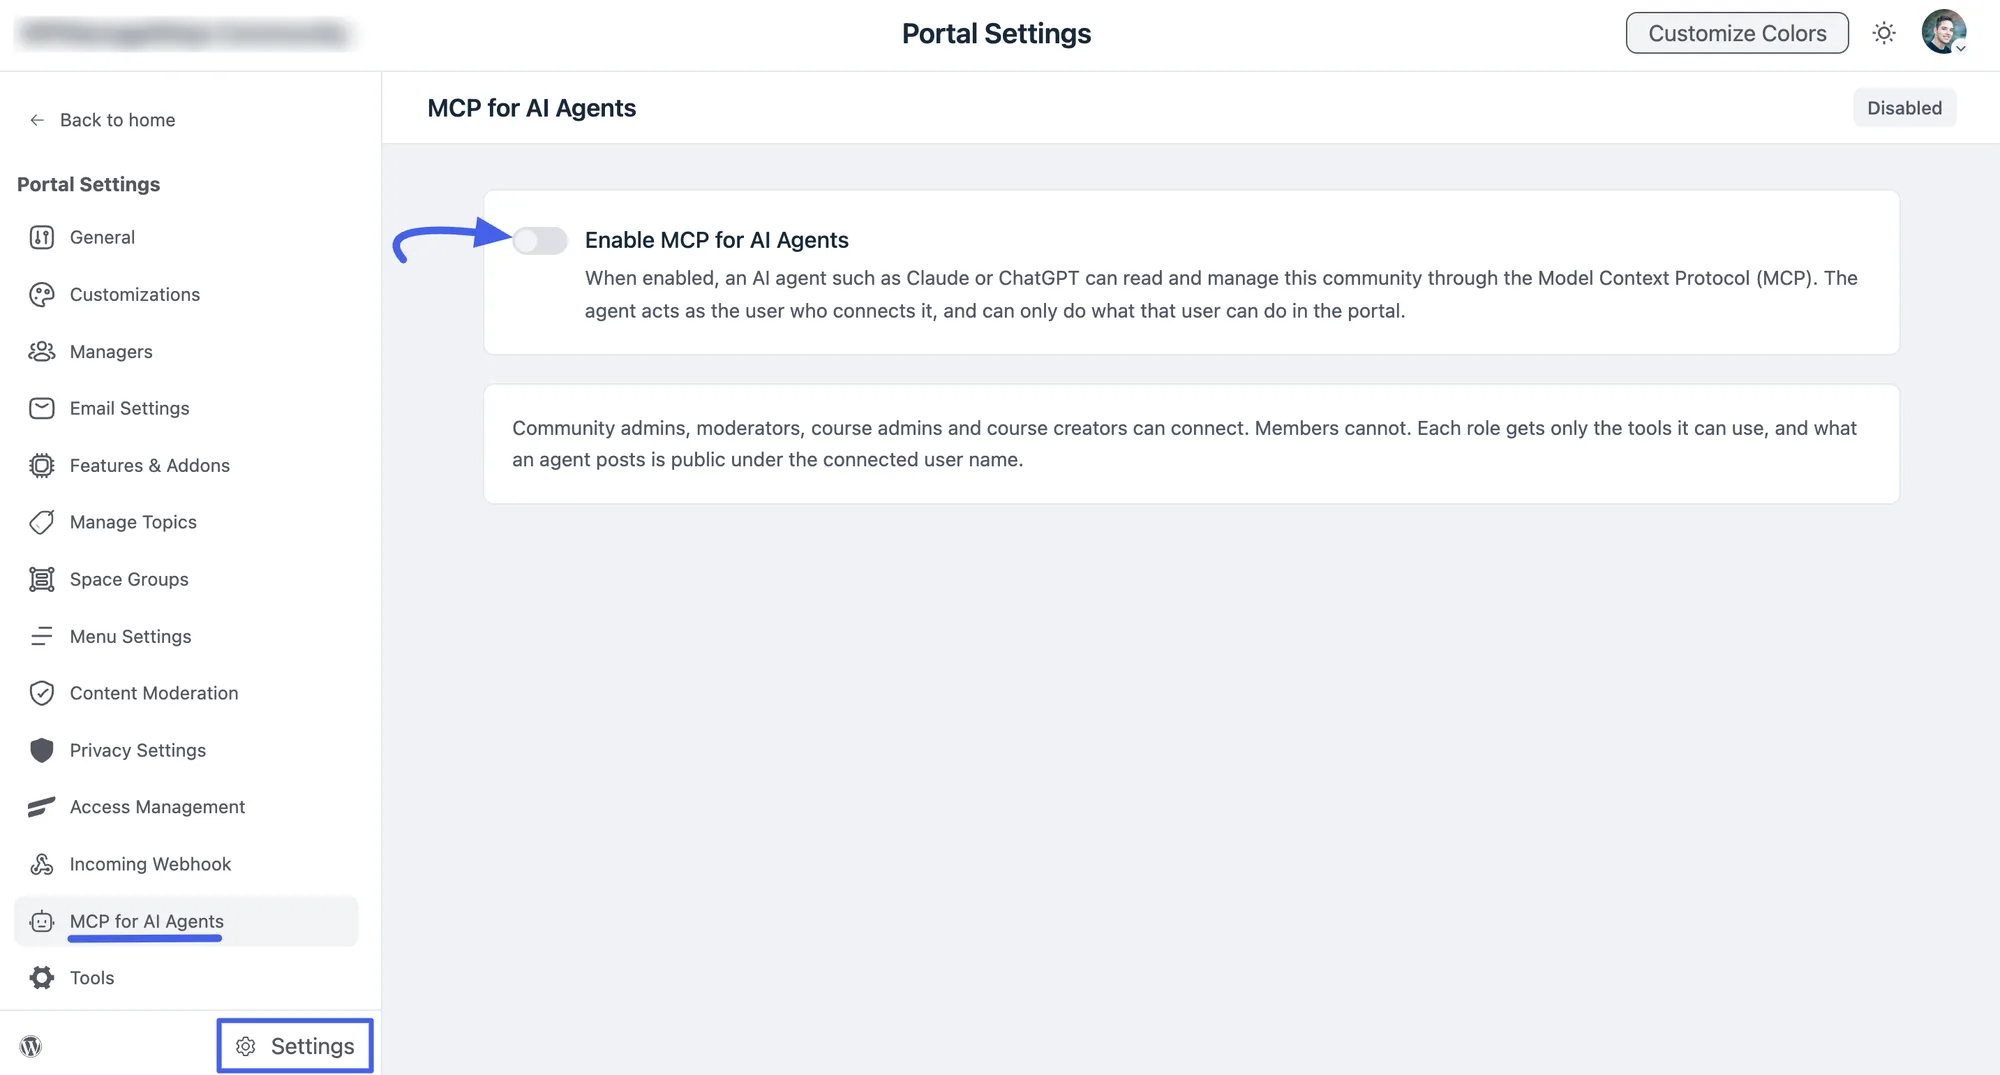
To pause every connected AI client at once, switch the toggle off. The endpoint stops answering MCP requests right away.
Step 2: Install FluentHub
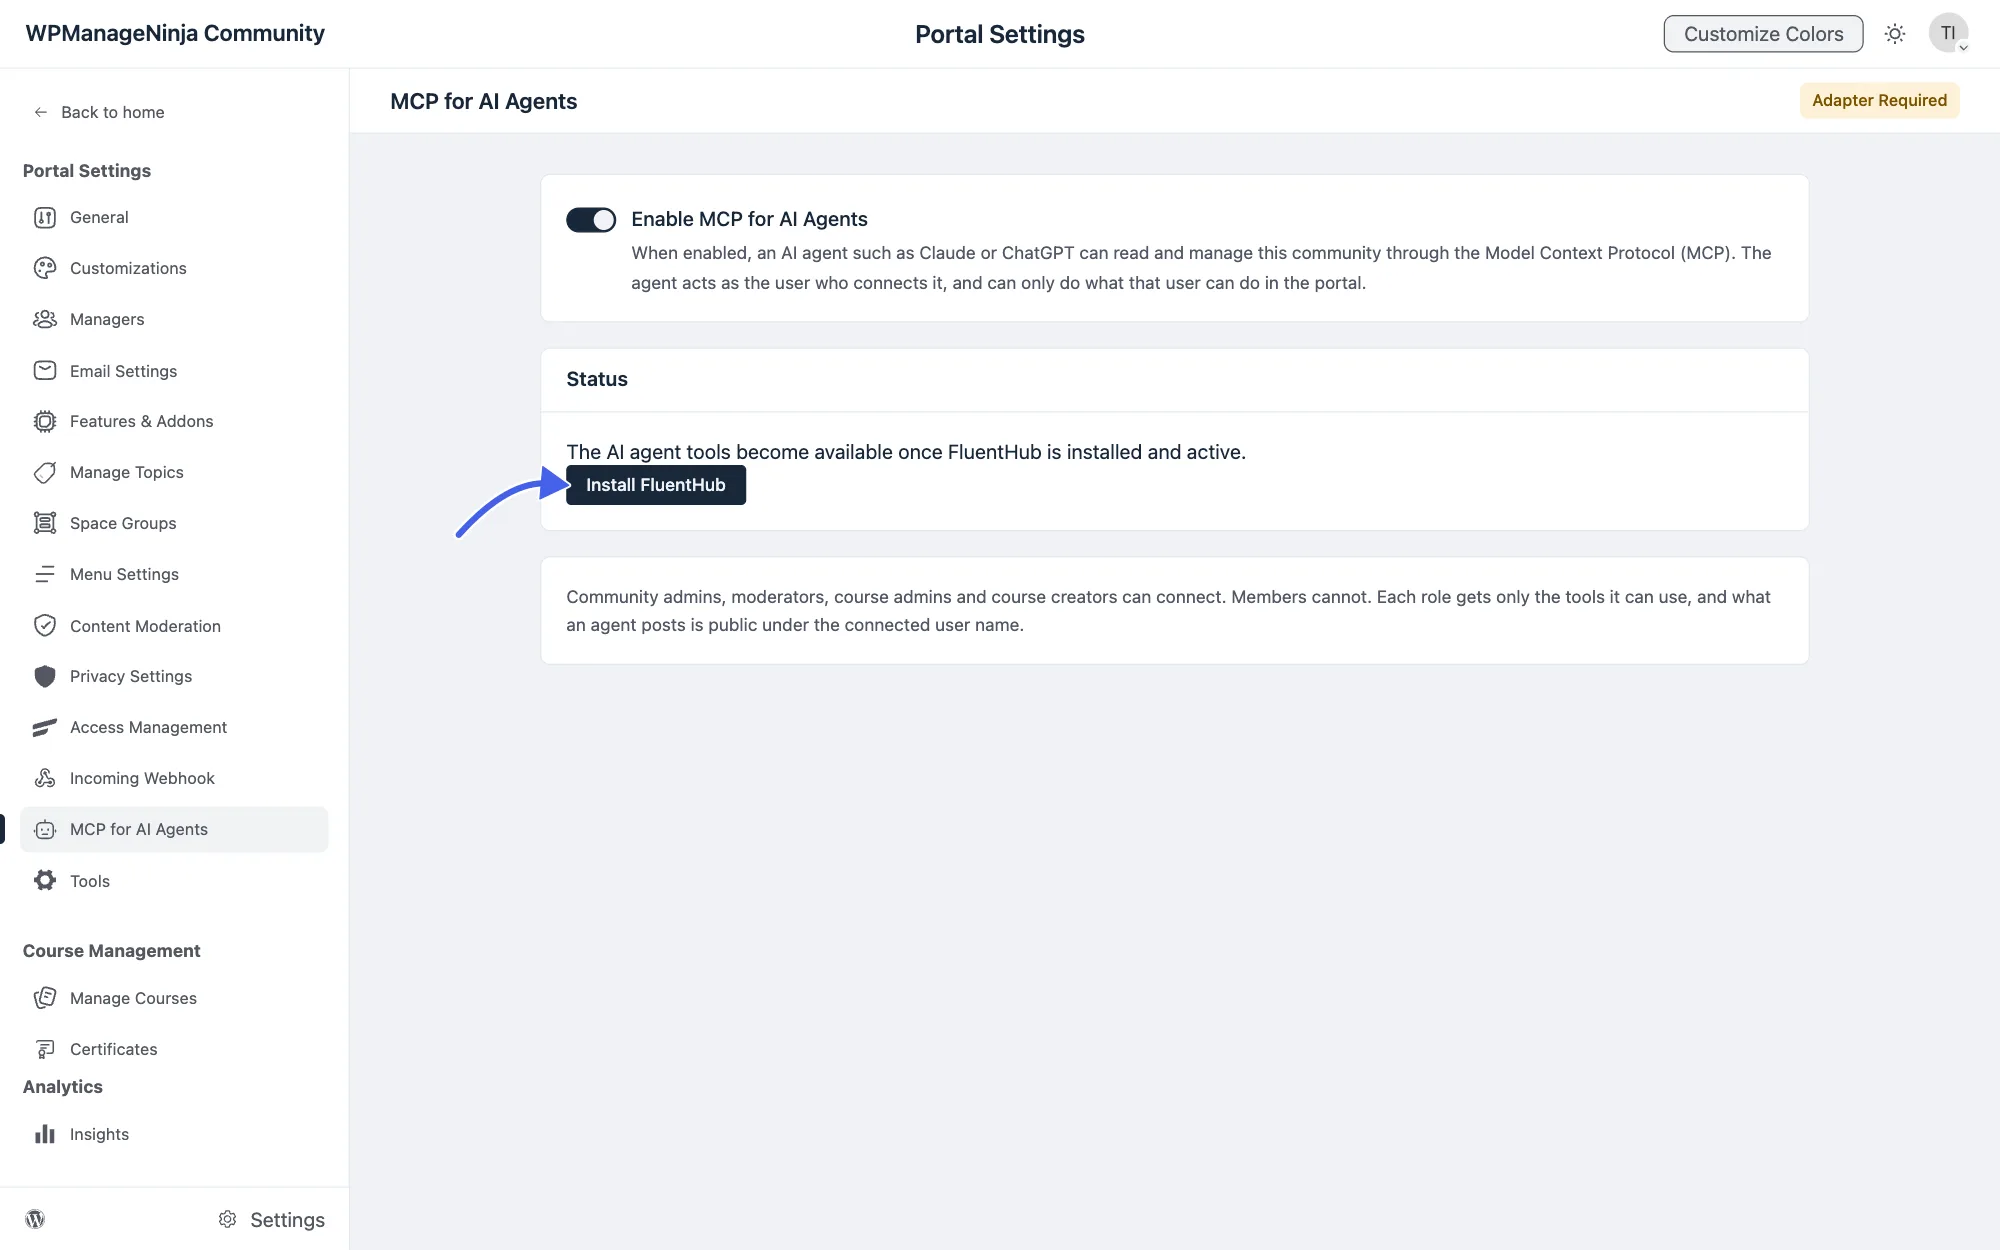
MCP needs an adapter plugin to work. FluentHub provides it. If your site has no adapter yet, the Status card shows an Adapter Required badge. It says the AI agent tools become available once FluentHub is installed and active.
Click Install FluentHub. WordPress installs and activates it, and the page then shows the connection details.
Prefer to install it yourself?
Download FluentHub directly from https://static.wpmanageninja.com/fluent-toolkit.zip, then upload the ZIP via Plugins → Add New → Upload Plugin and activate it. Come back to this page afterwards and the connection details appear.
If your site already has an MCP adapter
Another plugin on your site may already provide an MCP adapter. In that case the Status card shows Adapter: Connected and you can skip this step.
If FluentHub is installed but inactive
The page tells you to activate FluentHub from the Plugins page. Activate it, then reload the page.
Step 3: Check the status
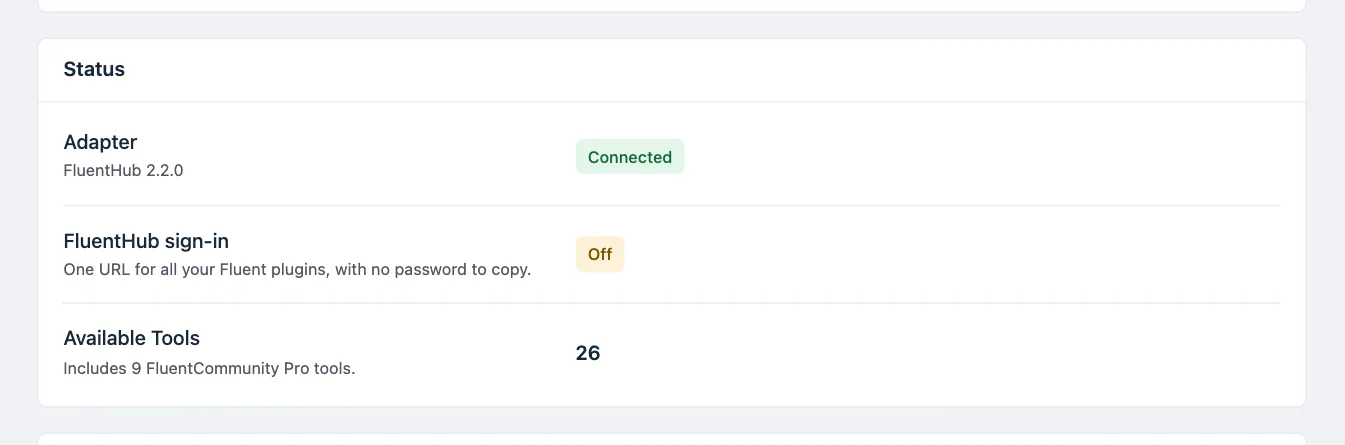
Once MCP is on, the Status card shows three things:
| Row | What it shows |
|---|---|
| Adapter | Whether FluentHub is Connected, with its version. |
| FluentHub sign-in | Whether the one-URL sign-in is On or Off. See Sign in with FluentHub. |
| Available Tools | How many MCP tools your site exposes. With Pro active, this includes the 9 Pro tools. |
The address your AI client connects to is https://your-site.com/wp-json/fluent-community/mcp. You don't need to copy it. It is already inside the snippet you copy in Step 5.
If the tool count is 0, check that MCP is switched on and the adapter shows Connected.
Step 4: Create an application password
AI clients sign in with a WordPress application password. This feature is built into WordPress, so you need no extra plugin. Each client gets its own password, so you can revoke one client without touching your main login.
On the MCP page, in the Connect a client card, click Open profile → Application Passwords.
Under New Application Password Name, enter a name that identifies the connection, such as
Claude CodeorCursor.Click Add Application Password.

Click Copy next to your new password right away. It looks like
xxxx xxxx xxxx xxxx xxxx xxxx, and WordPress shows it only once.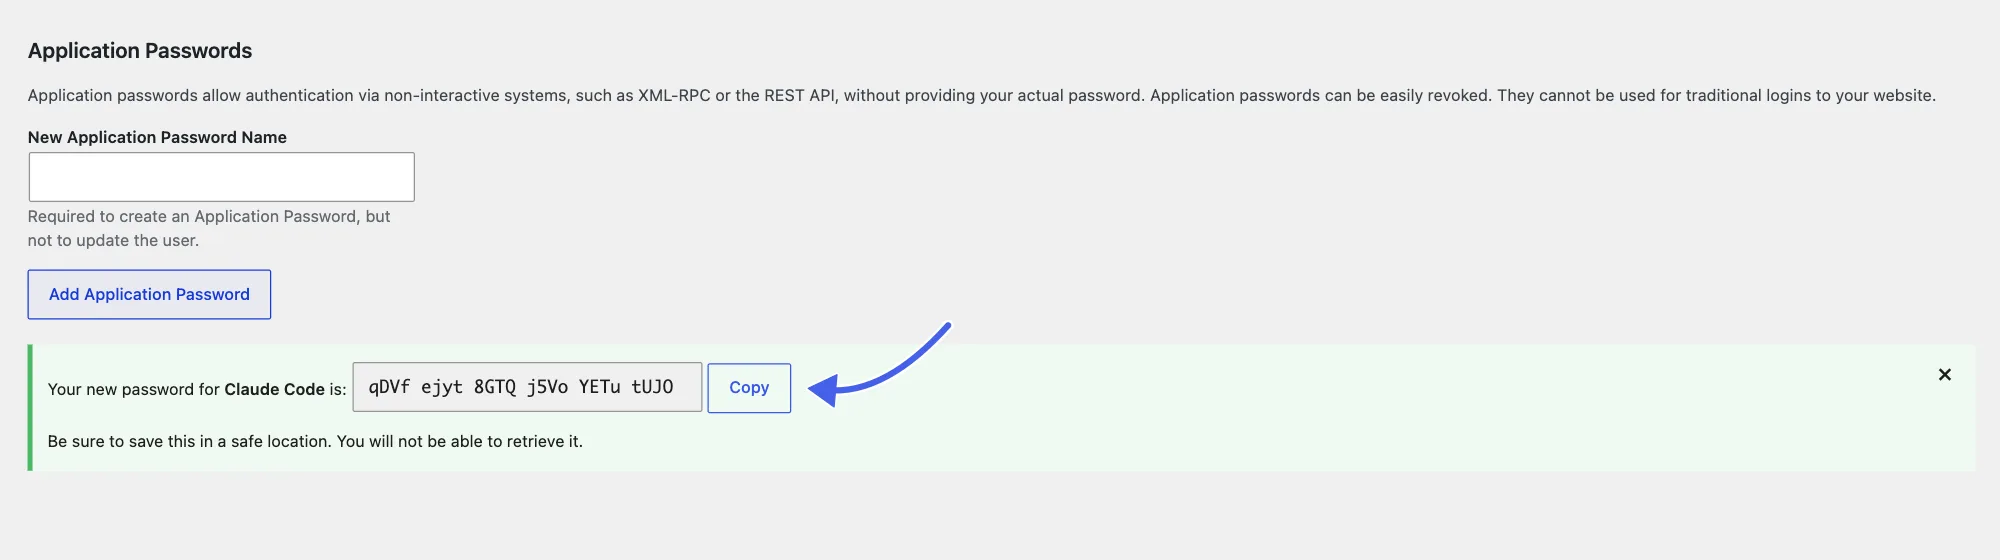
WARNING
Create the password on the account that should run the AI. The AI gets that user's community access, so a regular administrator account gives it broad access.
If the page says application passwords are switched off, your site is not using HTTPS, or a security plugin has disabled them.
Step 5: Connect your AI client
Back on the MCP page, use the Connect a client card:
- Enter your WordPress username.
- Paste the Application password. Spaces are fine.
- Pick the tab for your client: Claude Code, OpenAI Codex, Cursor, Other, or Claude Desktop. Other gives you the URL and the Basic authorization header for any client that supports HTTP.
- Click Copy snippet, then follow the note shown for that client.
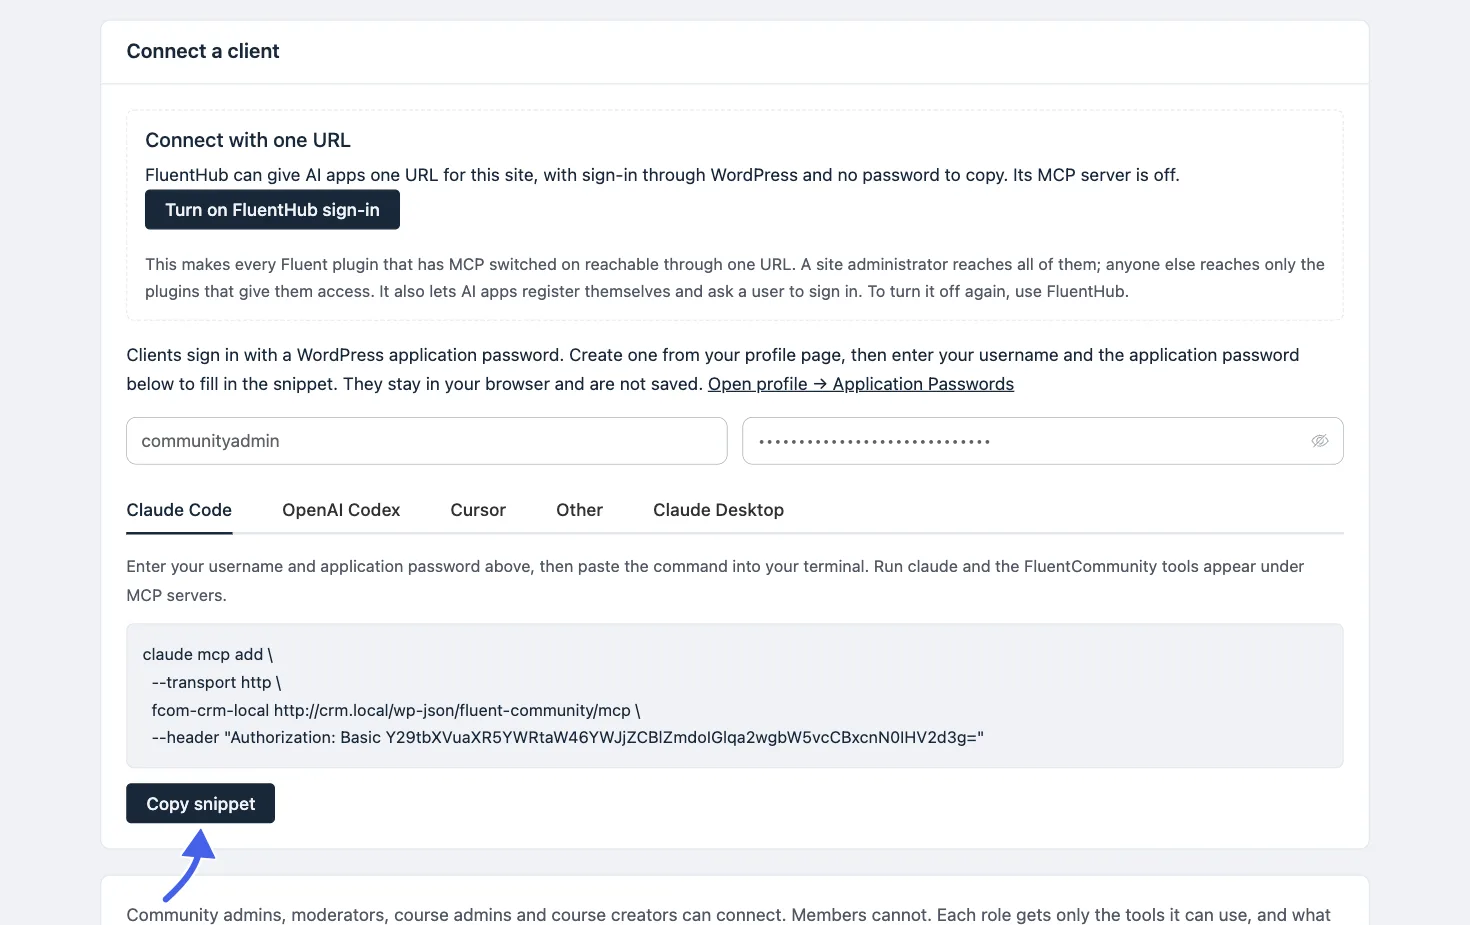
Your username and password stay in your browser and are not saved.
WARNING
The copied snippet contains your sign-in details. Treat it like a password. Never paste it into a public repository, a shared chat, or a screenshot.
The connection name your client sees is based on your site address, for example fcom-yoursite-com. This lets you connect more than one site to the same client.
Node.js and npx
Some clients need Node.js on your computer.
| Client | Needs Node.js? |
|---|---|
| Claude Code | Yes. It installs through npm. |
| Claude Desktop | Yes. It reaches your site through a small npx helper. |
| Cursor | No. It connects to the URL directly. |
| OpenAI Codex | No. You enter the URL and header in its settings. |
| Other | No. It depends on the app you use. |
To check, open Terminal (macOS) or Command Prompt (Windows) and run node -v. If it prints a version number, you are set. If not, install the LTS version from nodejs.org and reopen your terminal.
After you click Copy snippet, the next step depends on your AI app. Follow the section below for yours.
Claude Code
Claude Code is a command-line app, so you add FluentCommunity with one command.
On the Claude Code tab, click Copy snippet.
Open your terminal. Do not open Claude Code first.
Paste the command and press Enter. It looks like this:
bashclaude mcp add \ --transport http \ fcom-yoursite-com https://your-site.com/wp-json/fluent-community/mcp \ --header "Authorization: Basic <encoded-credentials>"Claude Code confirms that the server was added. To double-check, run
claude mcp list.Start Claude Code by running
claude. Type/mcpto see the FluentCommunity tools.
Claude Desktop
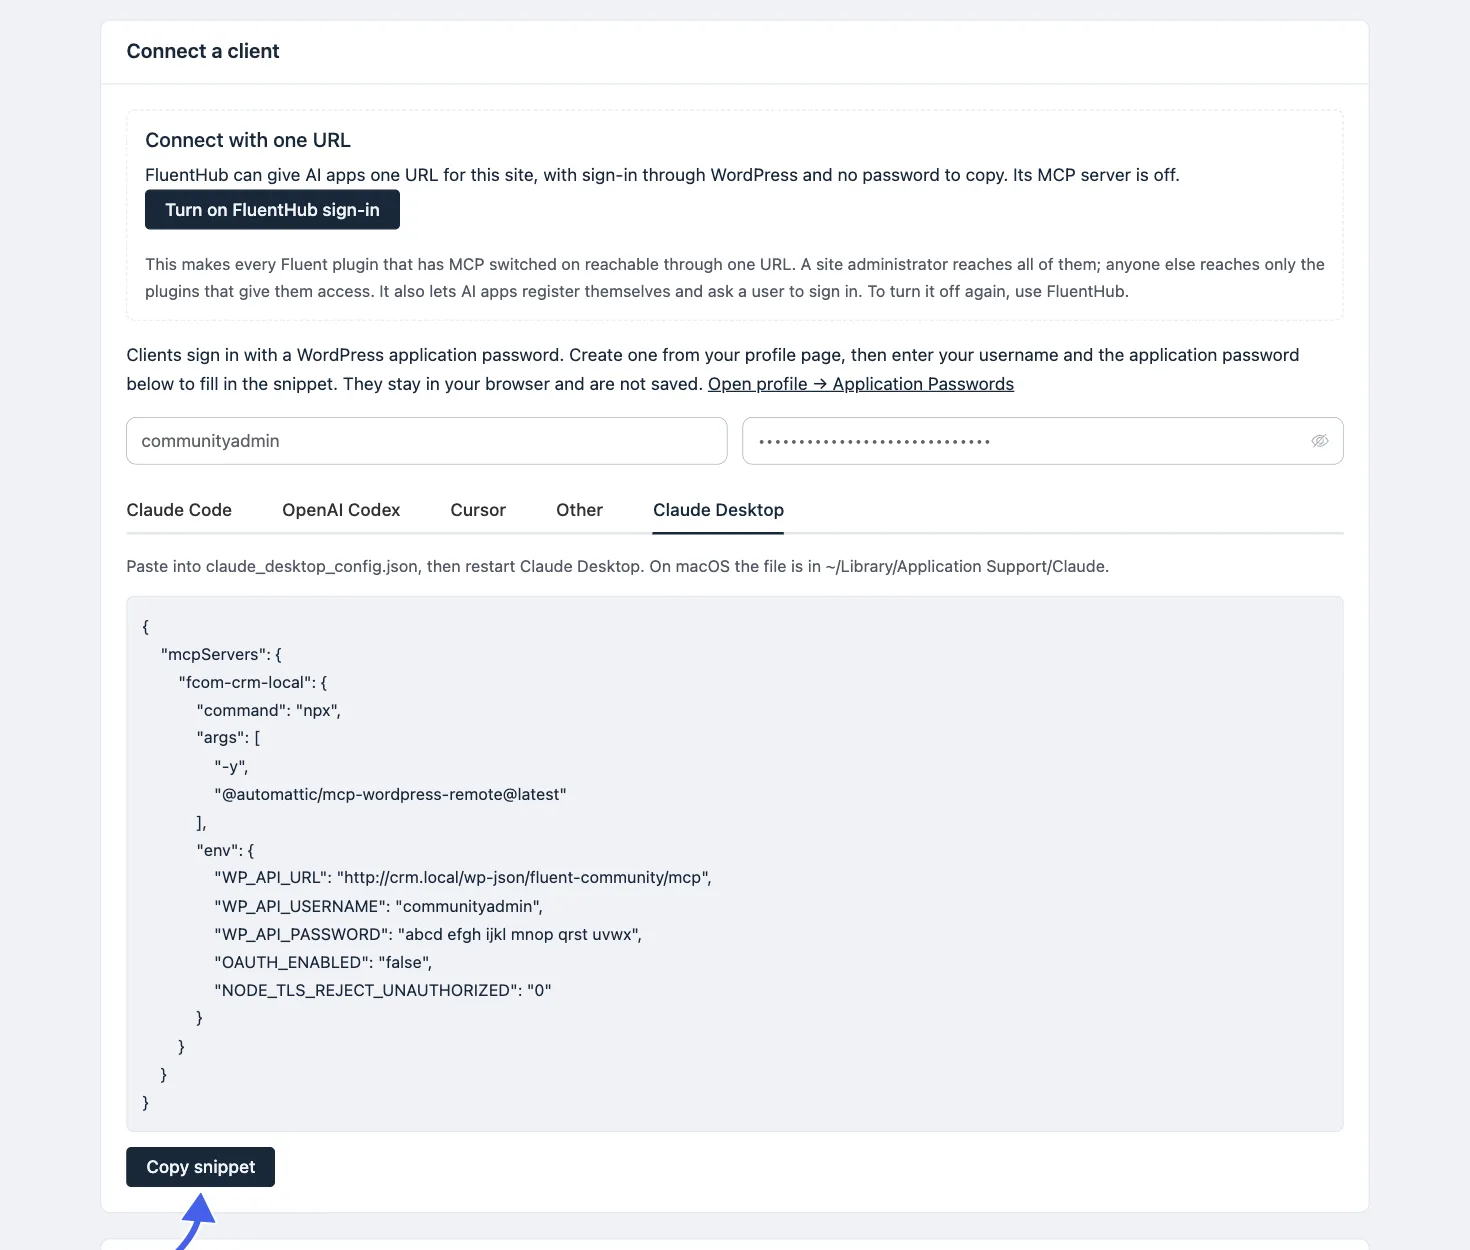
Claude Desktop reads its MCP servers from a configuration file. It opens that file for you.
- On the Claude Desktop tab, click Copy snippet.
- In Claude Desktop, go to Settings → Developer → Edit Config. The config file opens. On macOS it is in
~/Library/Application Support/Claude. - Paste the snippet into
claude_desktop_config.json. If the file already lists other servers, add FluentCommunity inside the existingmcpServersblock and keep the JSON valid. - Save the file.
- Fully quit Claude Desktop, then open it again. Closing the window is not enough. Quit from the menu bar (macOS) or the system tray (Windows).
- Start a new chat. The FluentCommunity tools appear in the chat's tools list.
Cursor
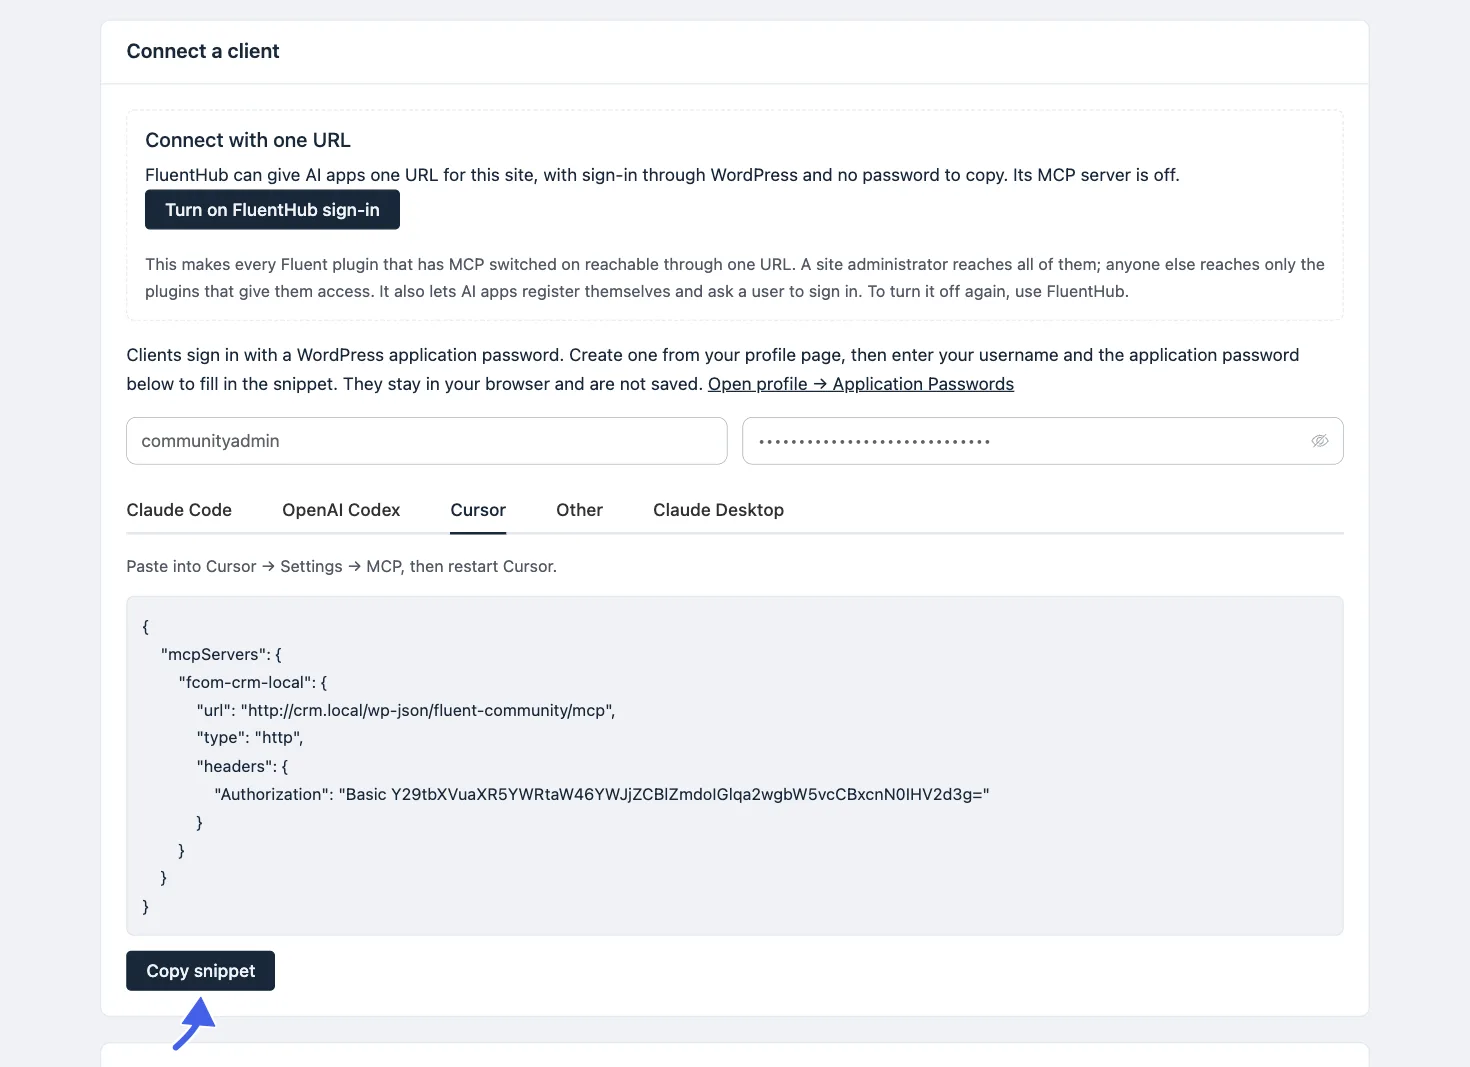
Cursor connects to the URL directly, so there is nothing to install.
- On the Cursor tab, click Copy snippet.
- In Cursor, open Settings → MCP.
- Paste the snippet into the MCP configuration file that Cursor opens. Keep the JSON valid if other servers are already listed.
- Save the file and restart Cursor.
- Open Settings → MCP again. The FluentCommunity server appears with its tools listed under it.
OpenAI Codex
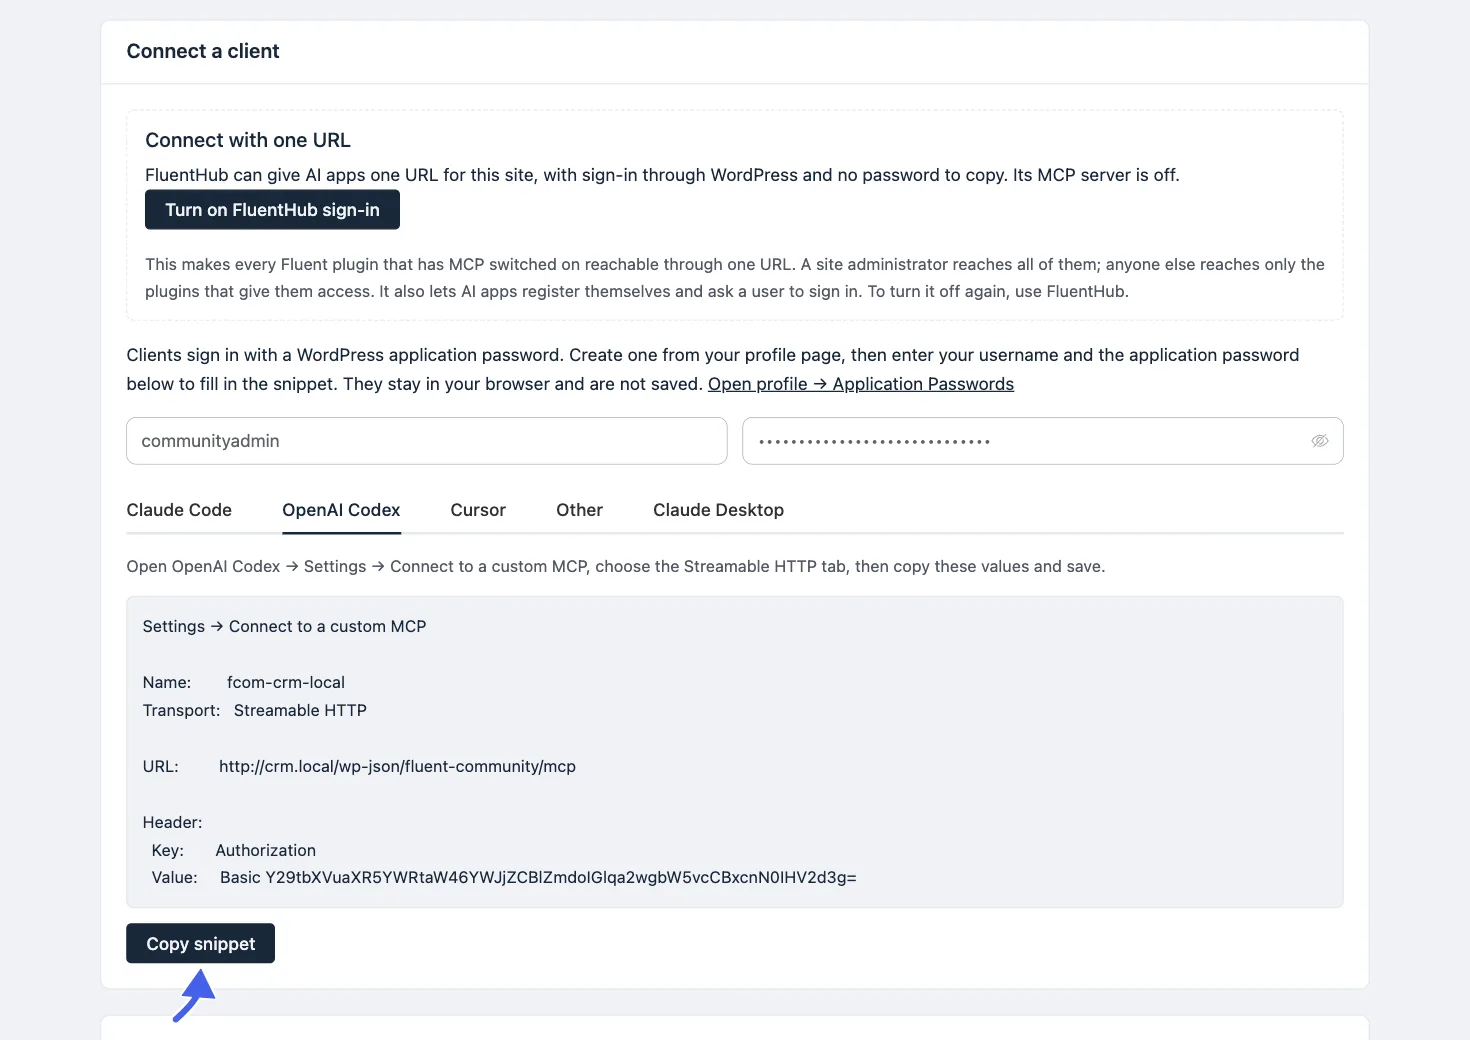
Codex asks you to enter the connection values one by one, instead of pasting a command.
- On the OpenAI Codex tab, click Copy snippet.
- In OpenAI Codex, open Settings → Connect to a custom MCP.
- Choose the Streamable HTTP tab.
- Enter the values from the snippet:
- Name: the connection name, for example
fcom-yoursite-com. - URL: your endpoint,
https://your-site.com/wp-json/fluent-community/mcp. - Header key:
Authorization - Header value: the
Basic ...value from the snippet.
- Name: the connection name, for example
- Save. The FluentCommunity tools are now available in your Codex chats.
Other AI apps
The Other tab works with any app that supports MCP over HTTP. Use it when your app is not in the list above. It gives you the two things every MCP app asks for:
- URL: the FluentCommunity MCP endpoint.
- Auth: an
Authorization: Basic ...header that carries your username and application password.
- On the Other tab, click Copy snippet.
- In your AI app, add a new MCP server and choose the HTTP (or Streamable HTTP) transport.
- Paste the URL into the server URL field.
- Add the
Authorizationheader with theBasic ...value. - Save, then restart the app if it asks you to.
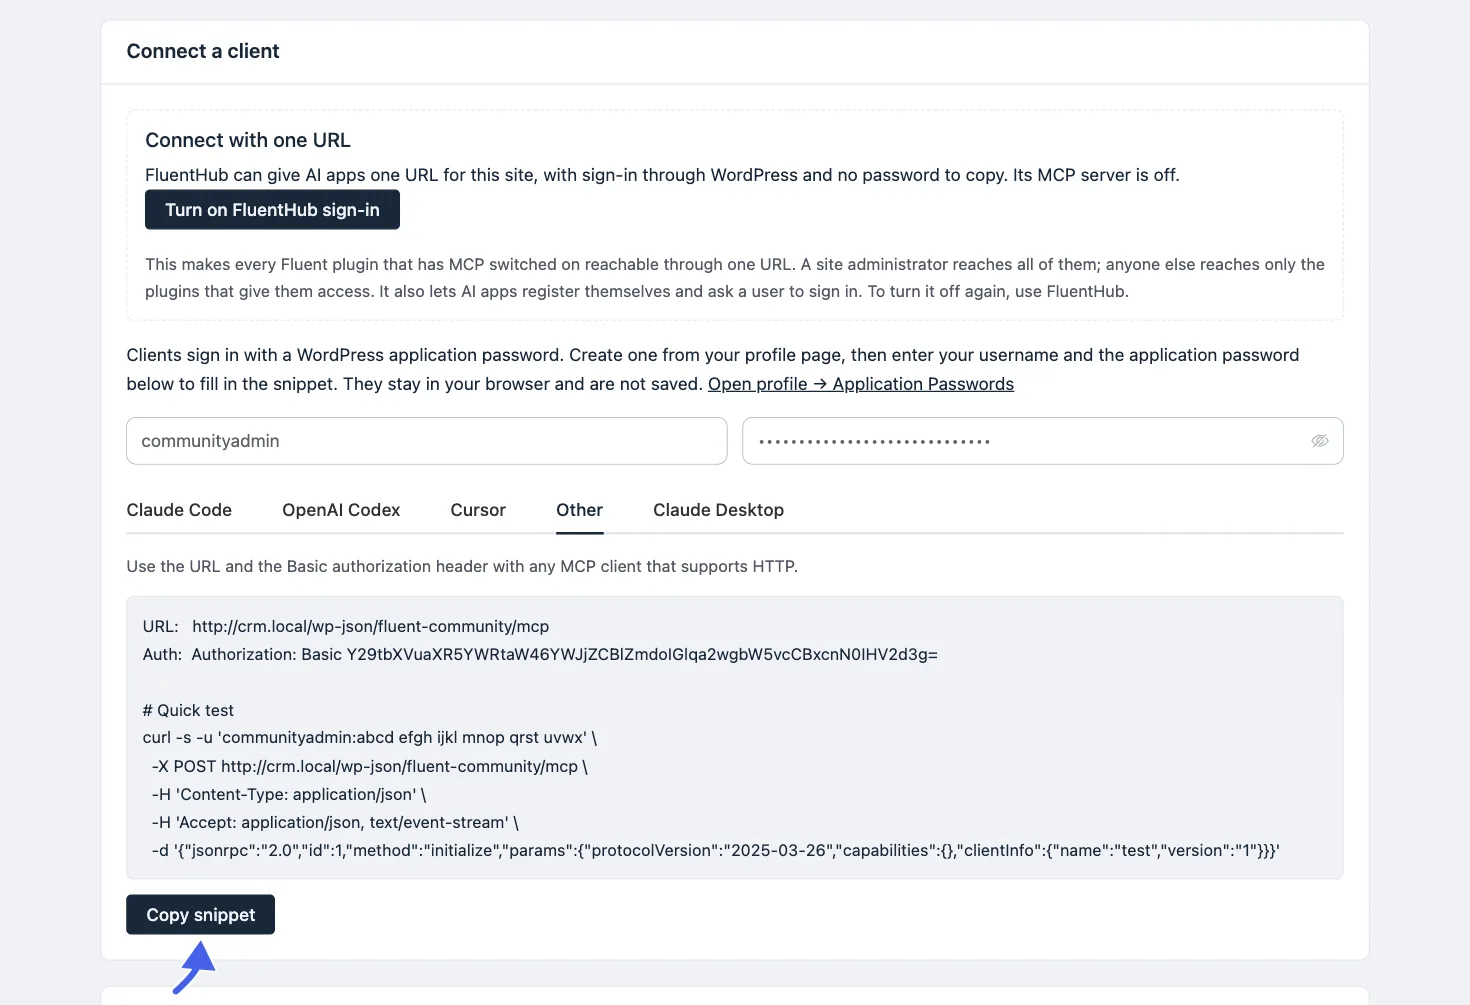
The snippet also includes a Quick test. Paste its curl command into your terminal to check the connection before you set up your app. If the site answers with a short block of JSON that includes protocolVersion, the connection works. An "Unauthorized" answer means the username or application password is wrong.
Step 6: Check that it works
Ask your AI client something only your community can answer. For example:
"Catch me up on what's new in my community since I last checked."
If the reply shows your real spaces and posts, the connection is live.
What your AI agent can do
You never call tools by name. The assistant picks the right one from your request. Which tools it can use depends on the connected user's role.
Community and members
- Get Community Context: Reads your spaces, courses, topics, and what needs attention. The assistant calls this first.
- Search Community: Searches posts, comments, people, spaces, and courses in one go.
- List Posts and Get Post: Browse posts, read full threads, and catch up on new activity.
- List Members and Get Member: Browse members, find inactive ones, and read a profile with points and badges.
- Save Post: Creates or updates a post.
- Save Comment: Adds, replies to, or updates a comment.
- Upload Image: Uploads an image to attach to a post or comment.
- Like Post or Comment: Likes or unlikes content as the connected user.
Moderation
- Moderate Content: Pins, unpins, locks, or moves posts, or pins a comment. Each action can be undone.
- Delete Post or Comment: Permanently deletes a post with its comments, or a comment.
Courses
These tools appear only when the Course module is on.
- List Courses and Get Course: Read your courses, sections, and lessons.
- Get Block Editor Guide: Gives the assistant the rules for writing lesson content.
- Create Course Content: Creates a course with its sections and lessons. Everything starts as a draft.
- Update Course Content: Edits a course, section, or lesson. Set the status to published to make it visible to students.
TIP
New course content is always a draft. Review it in the course editor before you publish. Video, documents, and cover images are added in the course editor, not through MCP.
FluentCommunity Pro tools
With Pro active, the assistant also gets these tools:
| Tool | What it does |
|---|---|
| List Moderation Queue | Lists reported posts and comments, pending members, and join requests. |
| Review Report | Approves or hides a reported post or comment. |
| Manage Member | Approves, blocks, or unblocks a member. |
| Manage Space Members | Adds or removes space members, sets roles, and approves join requests. |
| List Students | Lists a course's students with their progress. |
| Manage Enrollment | Enrolls, schedules, or unenrolls students, many at once. |
| List Quiz Results | Lists quiz results and answers waiting for grading. |
| Manage Quiz Result | Grades written answers or gives an extra attempt. |
| Get Insights | Reads the Insights reports for growth, engagement, and courses. |
Without Pro, these tools still appear in the list, but calling one explains that it needs FluentCommunity Pro.
Who can connect
Community admins, moderators, course admins, and course creators can connect. Regular members cannot. Each role gets only the tools it can use, and whatever the AI posts is public under the connected user's name. Each tool also checks the user again:
| Role | Can use |
|---|---|
| Community managers (space admins and moderators) | Reading, posting, commenting, liking, and deleting |
| Moderators | Moderation tools |
| Course creators | Course tools |
| Site administrators | Everything, including insights |
A blocked or pending member cannot connect.
Security and safety
- Posts act immediately. Saving a post or comment publishes it right away and notifies members. There is no draft. Ask the assistant to show you the text first if you want to review it.
- Deletes cannot be undone. The assistant is told to preview a delete before doing it, and to prefer reversible actions like pinning or locking.
- Member content is treated as data. The assistant is told not to follow instructions found inside posts or comments.
- Rate limits apply. The site rejects duplicate posts and limits posting speed.
Revoke access
- One AI client: go to Users → Profile → Application Passwords, find the connection by name, and click Revoke.
- Every client at once: switch off Enable MCP for AI Agents.
- Rotate a password: revoke the old one, create a new one, copy a fresh snippet, and paste it into your client.
TIP
Give each AI client its own application password. Then you can revoke one without breaking the others.
Sign in with FluentHub instead of a password
FluentHub can give AI apps one URL for your whole site and sign them in through WordPress, with no password to copy. If it is available, the MCP page shows a FluentHub sign-in section. Use Turn on FluentHub sign-in to enable it, or Use an application password instead to keep the steps above. Use Manage connections in FluentHub to review connected apps.
Troubleshooting
The tool count is 0. Switch on Enable MCP for AI Agents and make sure FluentHub is active.
The page says WordPress 6.9 is required. Update WordPress. The MCP server needs the Abilities API from 6.9.
"Unauthorized" in the AI client. The username or application password is wrong. Create a new password, then copy a fresh snippet.
"Only community managers can use the server." The connected user has no community role. Connect with an administrator, moderator, or space admin account.
The tools do not appear in the client. Restart the client fully after you run the command or save the config file. Quit Claude Desktop from the menu bar or system tray.
"Server failed to start" in Claude Desktop or Codex. Node.js is probably missing. Run node -v, and install the LTS version if needed.
Claude Desktop lost its MCP servers after an edit. The config file has a JSON error, usually a missing or extra comma. Paste it into your AI assistant and ask it to fix the syntax.
Works locally but not in production. Use the same scheme (http or https) and domain that the endpoint shows. WordPress also needs a reachable REST API at /wp-json/.
A Pro tool says it needs FluentCommunity Pro. Install and activate the Pro plugin, and the tool works right away.