

Appearance
Connecting with FluentCart
This feature allows you to monetize your hard work by selling access to your premium Courses and Spaces. It's powered by a deep and seamless integration with FluentCart, our powerful e-commerce solution.
This guide will walk you through every step of the setup. While we use a Course as our main example, the setup process is absolutely identical for monetizing a Space.
Prerequisites
To use the Paywall, you must have both FluentCommunity and FluentCart installed and activated on your WordPress site.
How It Works
You don't need to be an e-commerce expert. When you link a product to your private course, FluentCommunity automatically creates an integration feed in FluentCart for you. This "feed" is the magic link that grants your customers access to the course immediately after they pay.
You only need to set it up here in your FluentCommunity settings, and all the e-commerce parts are handled for you.
The process involves three main stages:
- Set your content to private — this tells FluentCommunity the content is not public.
- Link a product — this is the product your customers will buy.
- Configure the lock screen — this is the sales page your customers will see.
Let's begin.
Step 1: Set Your Course or Space to Private
You can only charge for content that isn't public. This first step is the key that unlocks all the paywall options.
- Navigate to the Course or Space you want to sell.
- For a Course, navigate to it and click the Edit info link.
- For a Space, go to the Space, click the ⋮ (three-dot) menu, then select Settings.
- In the General Settings tab, scroll down to the Access Control section.
- Click the Privacy dropdown and select Private or Secret.
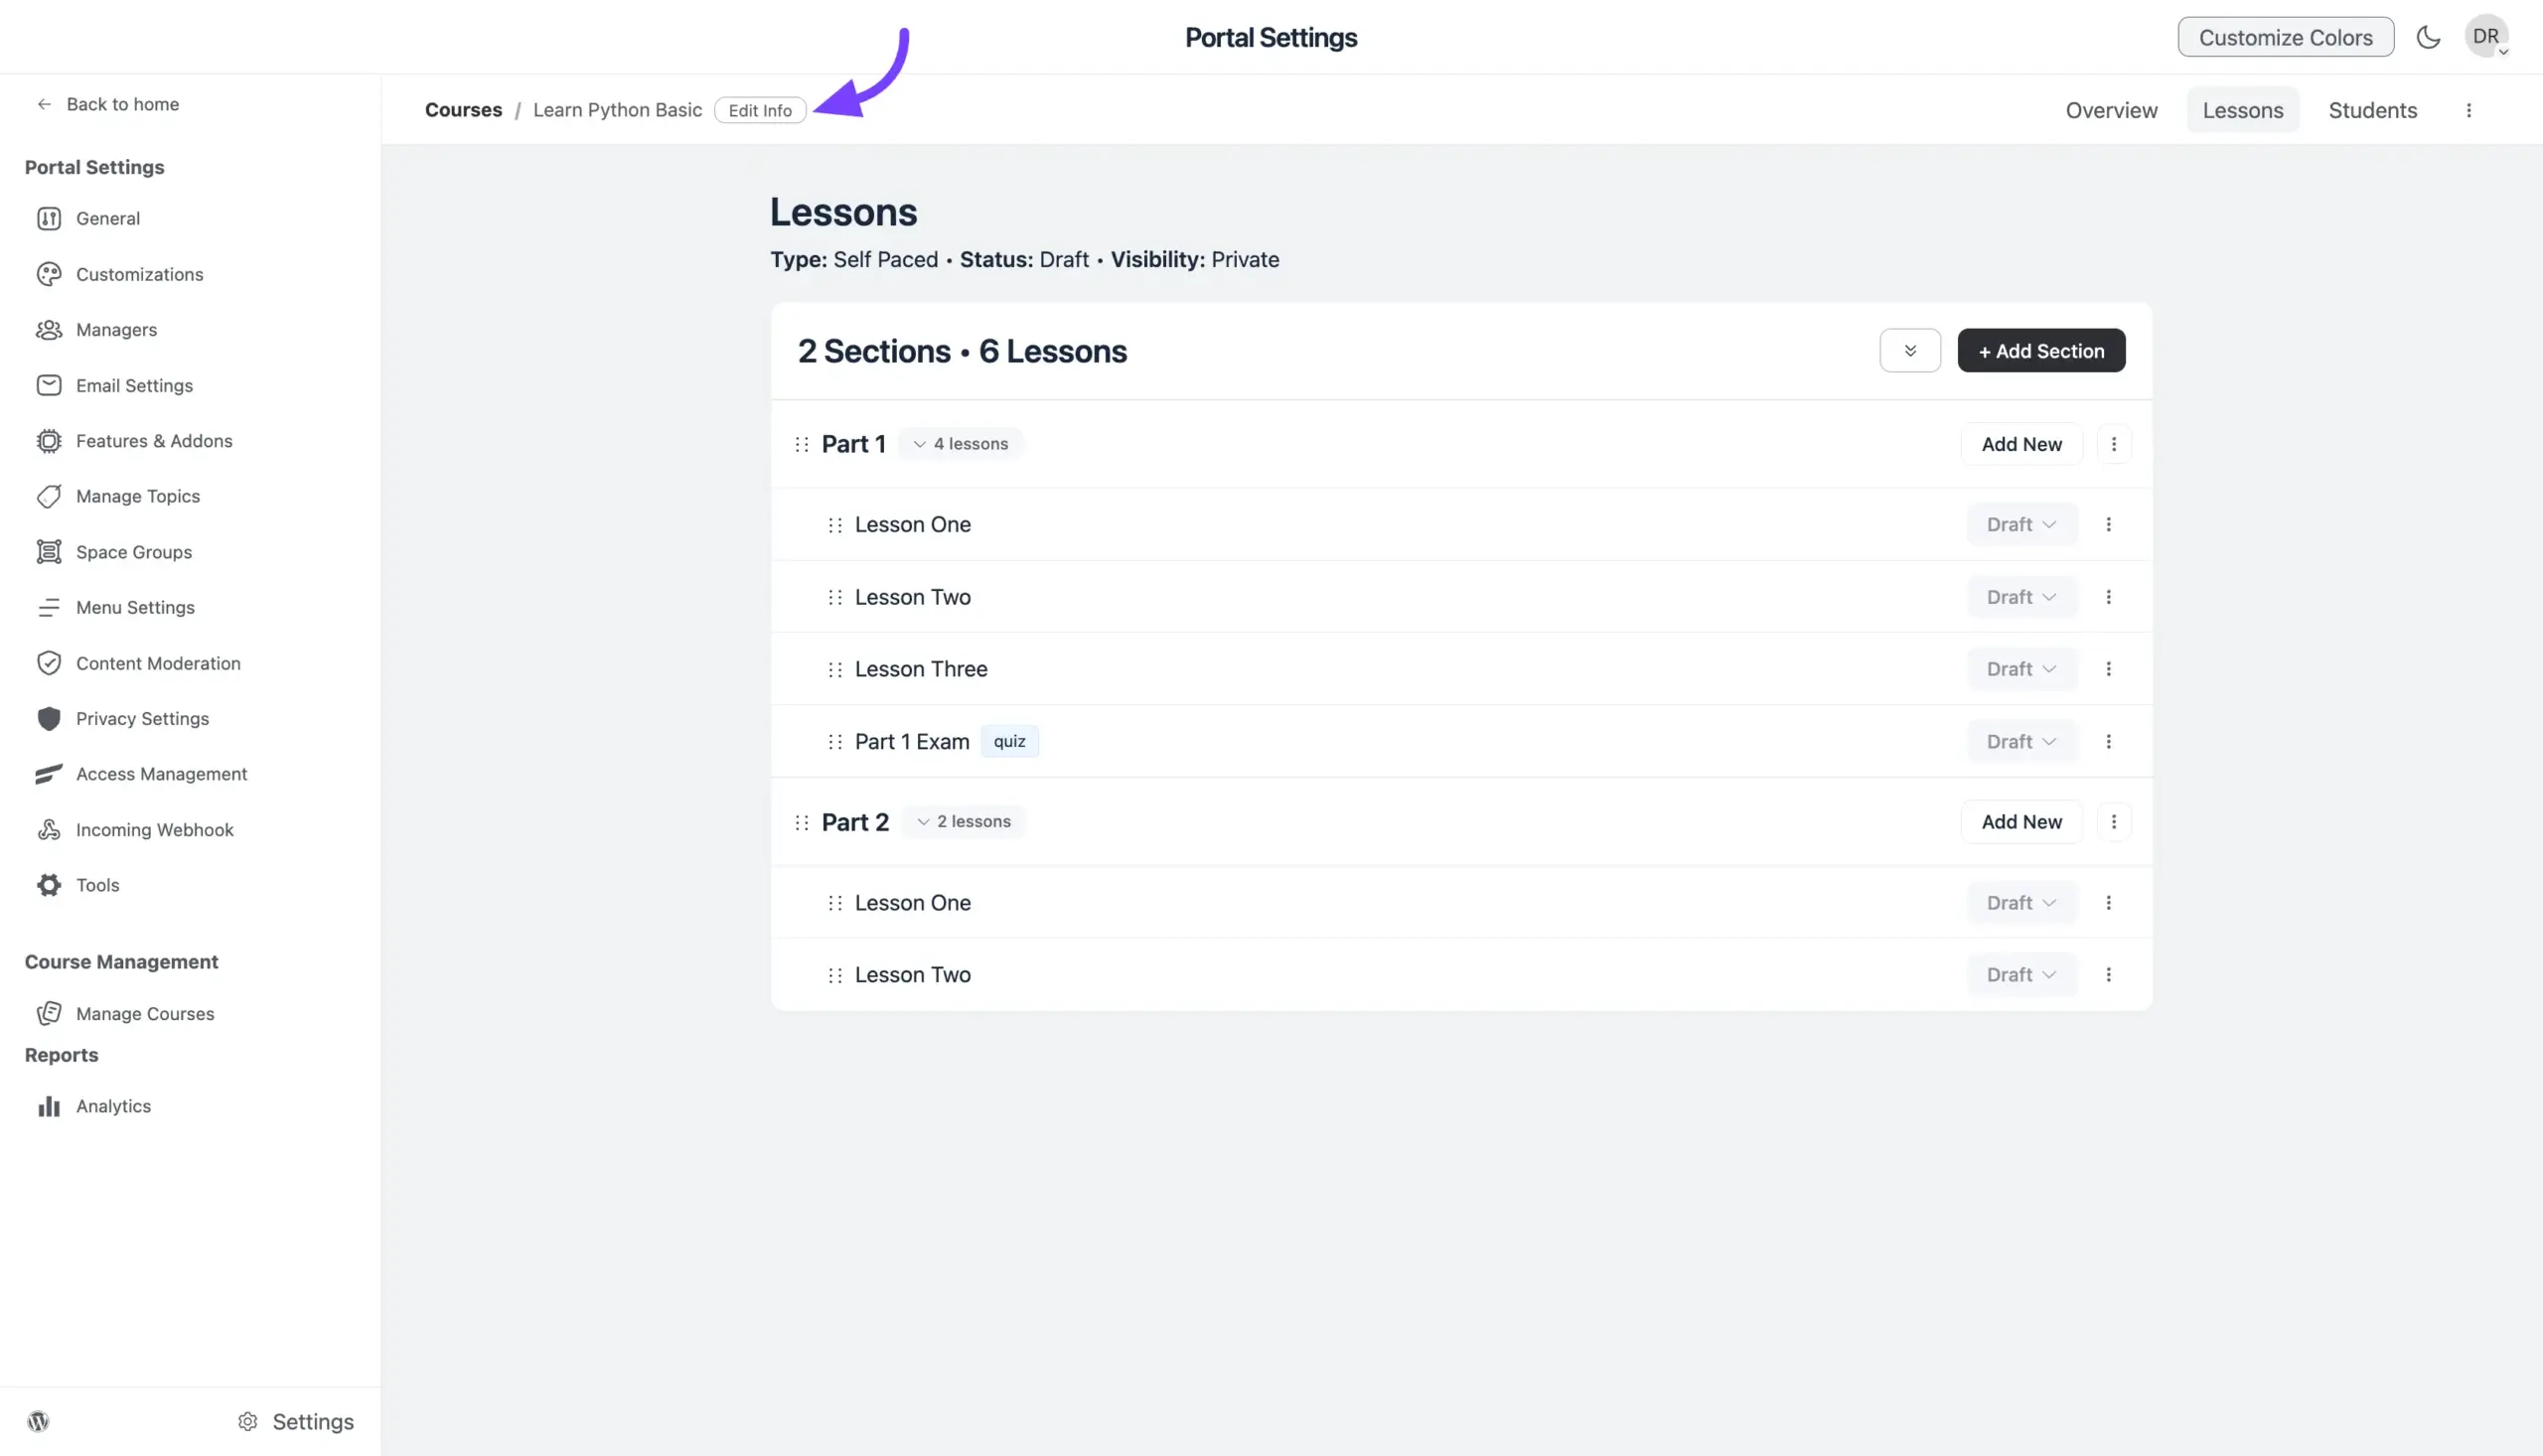
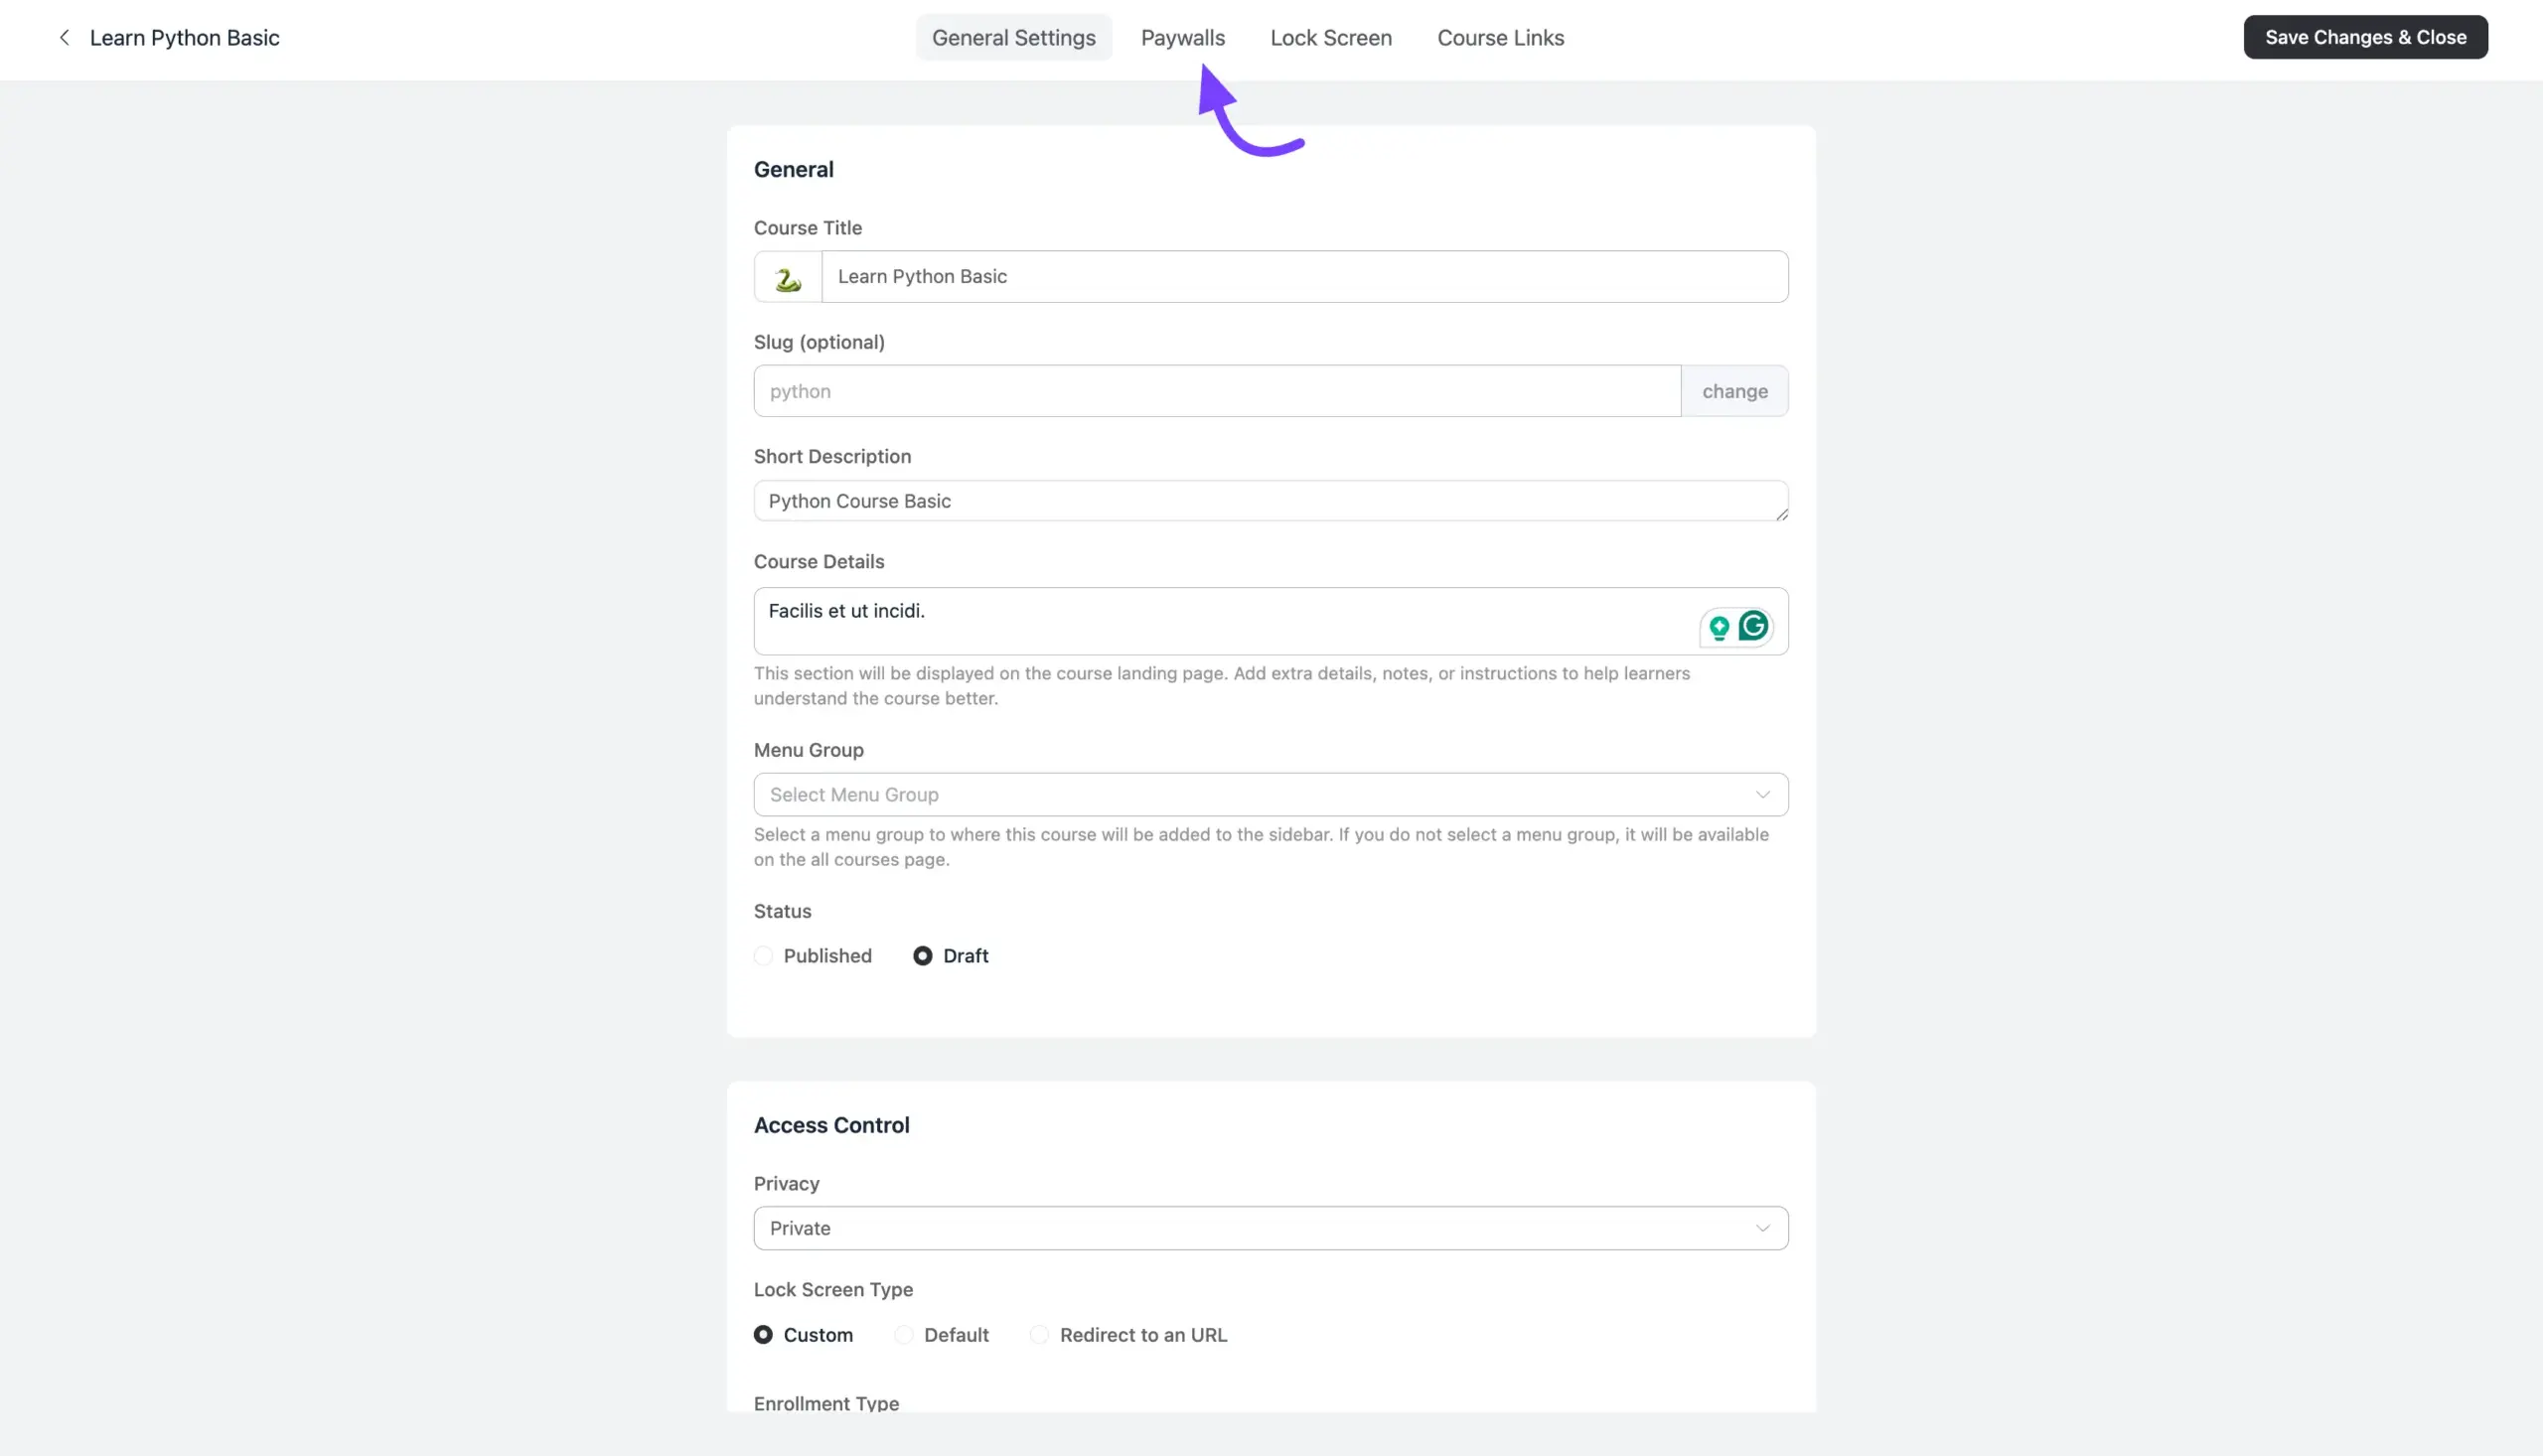
Once you set the privacy, new tabs appear at the top of the settings window, including Paywalls and Lock Screen. For a deeper look at the privacy options for courses, see Course Privacy.
Step 2: Link a Product to Your Paywall
Now that your content is private, you need to link a product to it. This is the item your customers will add to their cart and purchase.
- Click the Paywalls tab at the top of the settings window.
- This screen shows all products that grant access. Since it's new, it will be empty. Click the Add Paywall button.
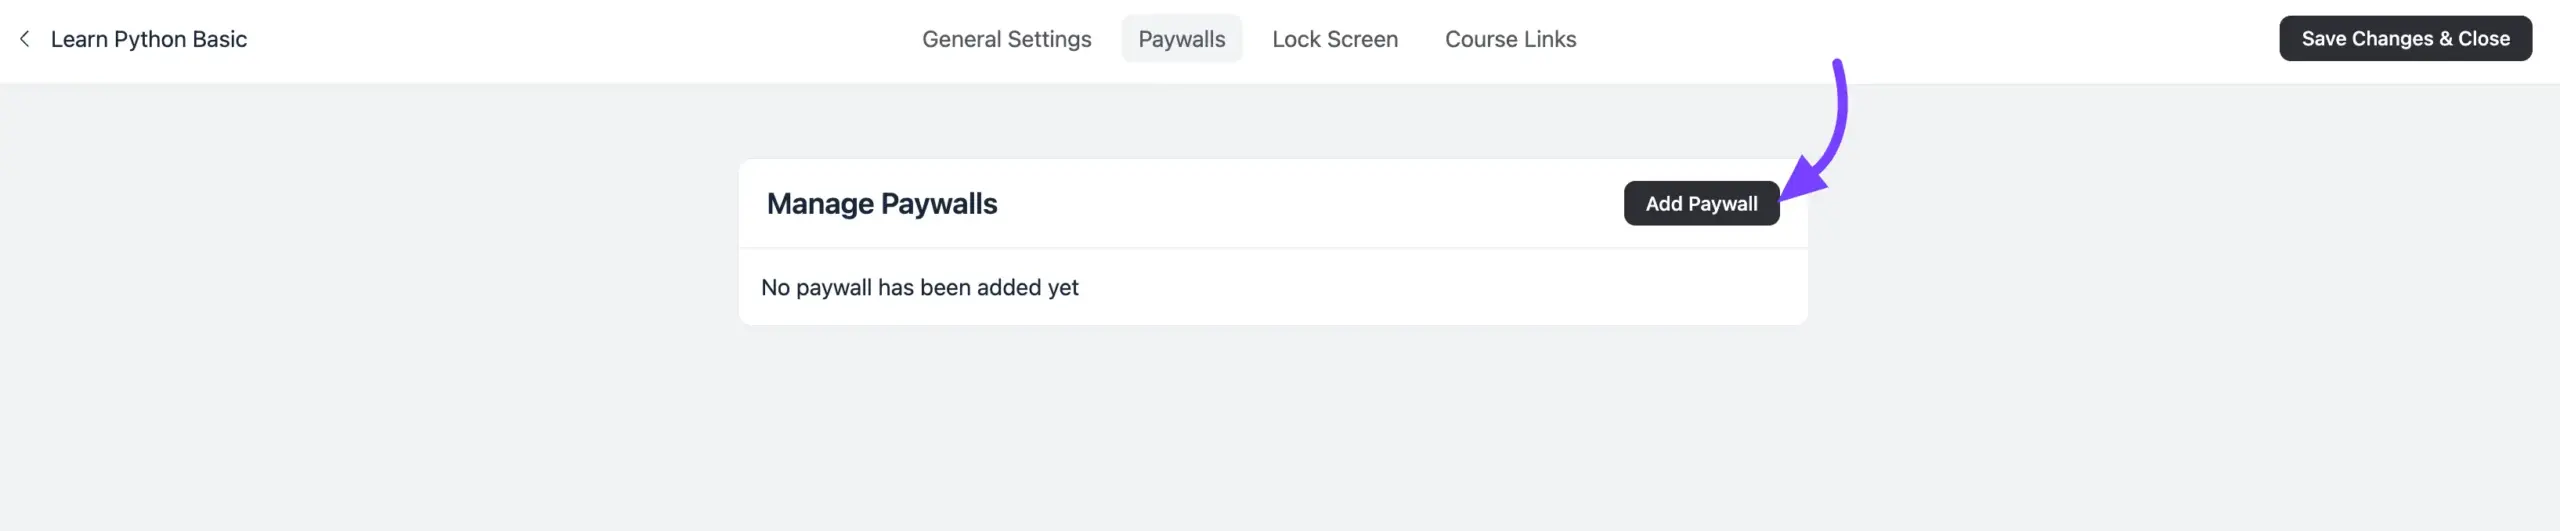
A pop-up window will appear, giving you two easy options:
Option A: Link an existing FluentCart product
If you have already created your product in FluentCart, simply start typing its name in the Search Product bar. Select it from the list when it appears.
Option B: Create a new product on the fly
You can create a new product without ever leaving this screen.
- Click the + New button.
- A form will appear. Enter a Title (e.g., "Learn Python Basic Access") and a Price.
- Click the Create button.
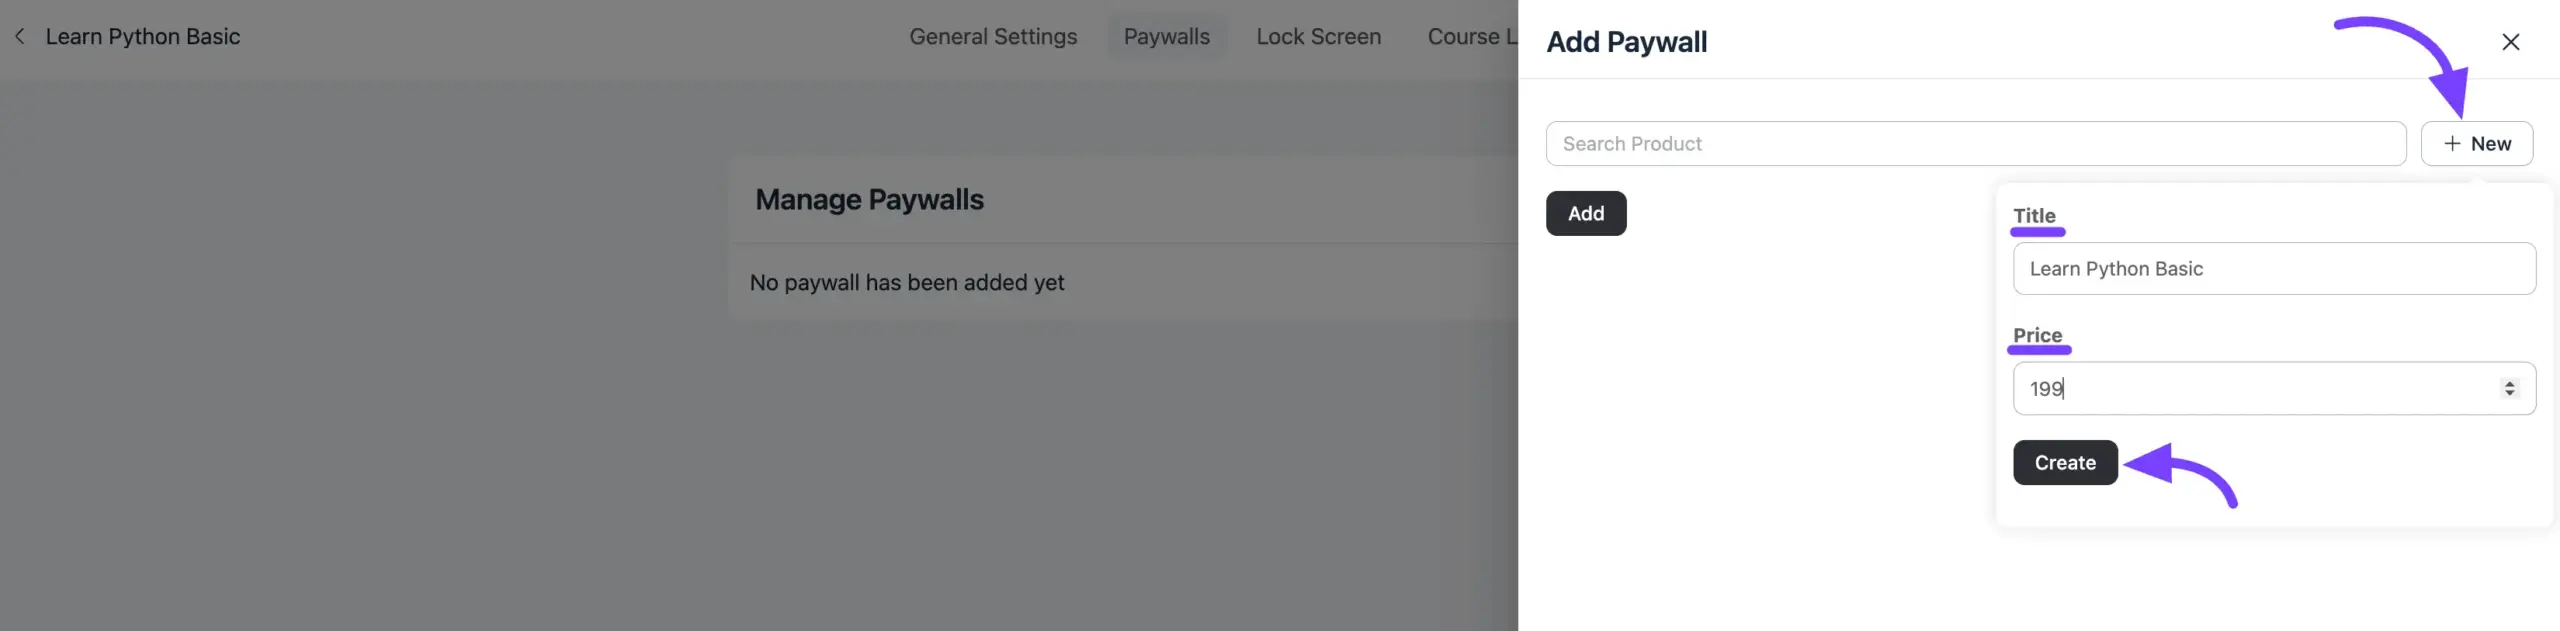
This will automatically create a new, simple product in FluentCart for you and link it. After adding your product, it will be listed on the Paywalls page. You have now successfully linked a purchasable product.
Step 3: Configure Your Lock Screen
The Lock Screen is your sales page. It's what non-members or logged-out users will see when they try to access your private content. You have two methods to set this up.
To choose your method, go back to the General Settings tab.
Method 1: The Easy Way (Default Lock Screen)
This is the quickest way to get your paywall live. It automatically adds a "Buy Now" section to the standard "This content is private" page.
- In the General Settings tab, find the Access Control section.
- Set the Lock Screen Type to Default.
- A new checkbox will appear. Check this box: Show Paywalls in the default lock screen.
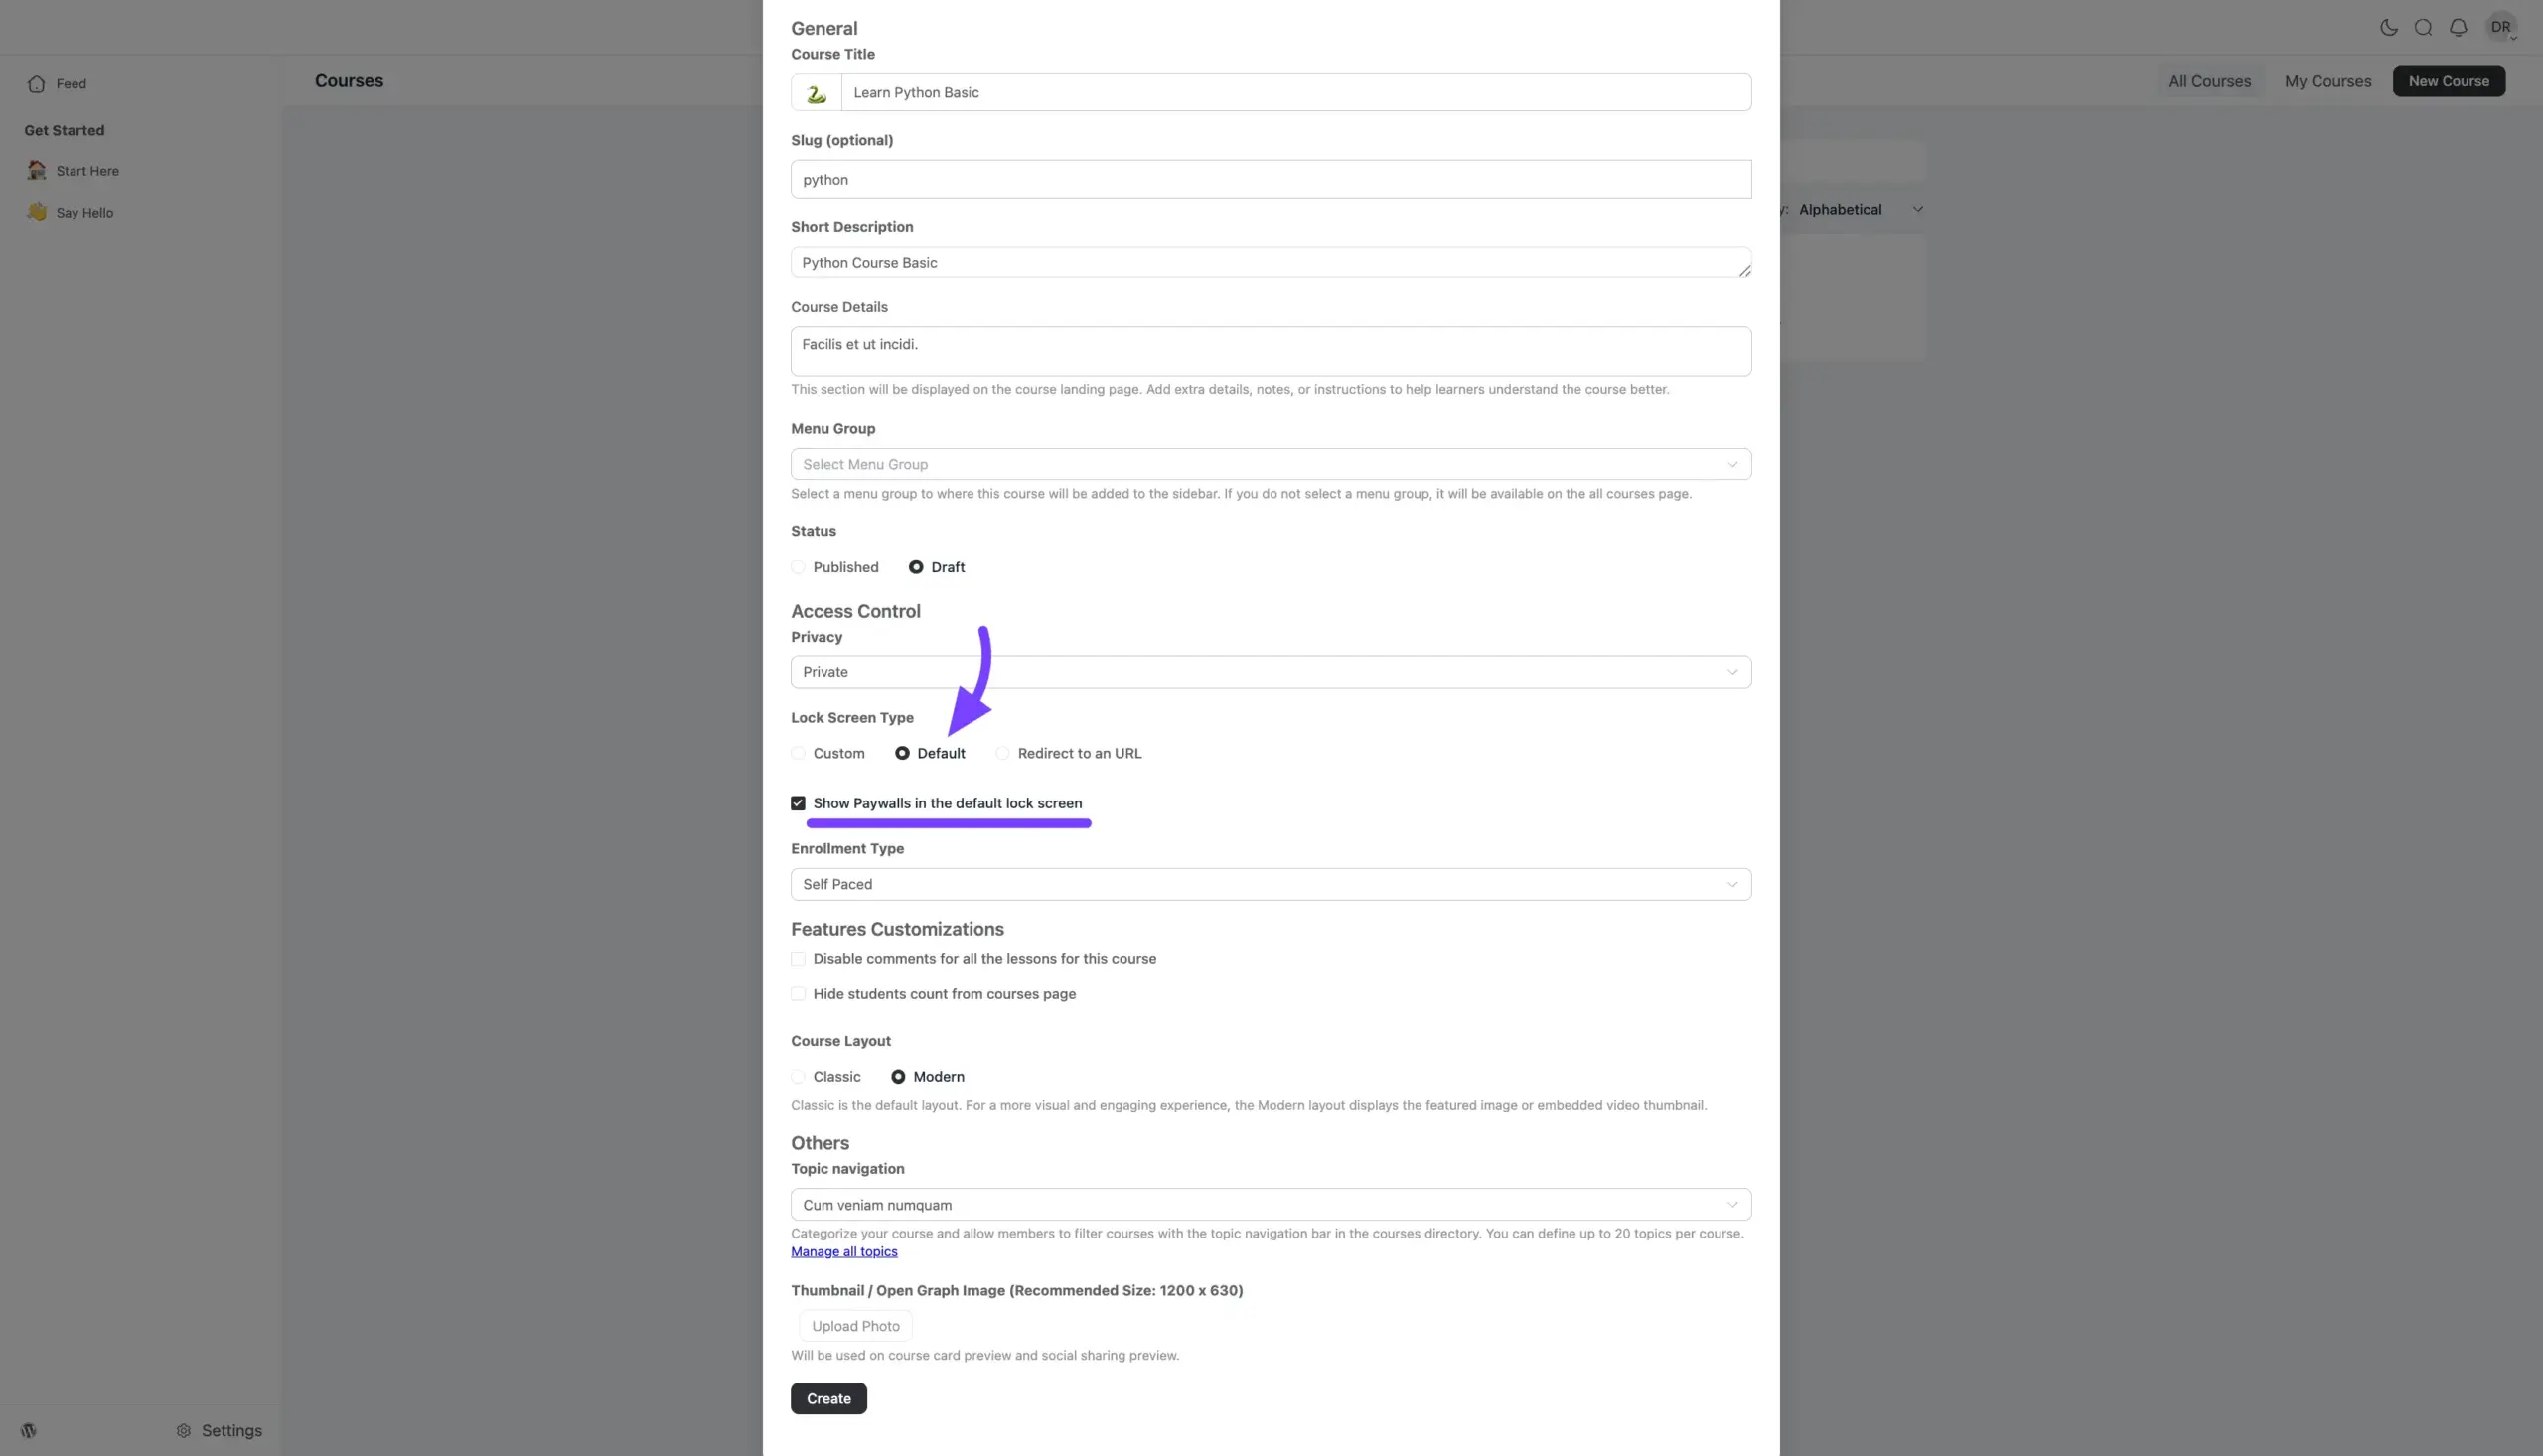
That's it. Click Save Changes & Close. Your paywall is now active.
Method 2: The Custom Builder (Full Visual Control)
This method lets you build a custom sales page using a drag-and-drop builder, all without leaving this screen.
- In the General Settings tab, set the Lock Screen Type to Custom.
- Go to the main Lock Screen tab at the top of the settings window.
- This opens a visual page builder. On the left side, under Page Blocks, you will see a block named Paywalls.
- Click the Eye icon on the Paywalls block from the left sidebar to make it appear.
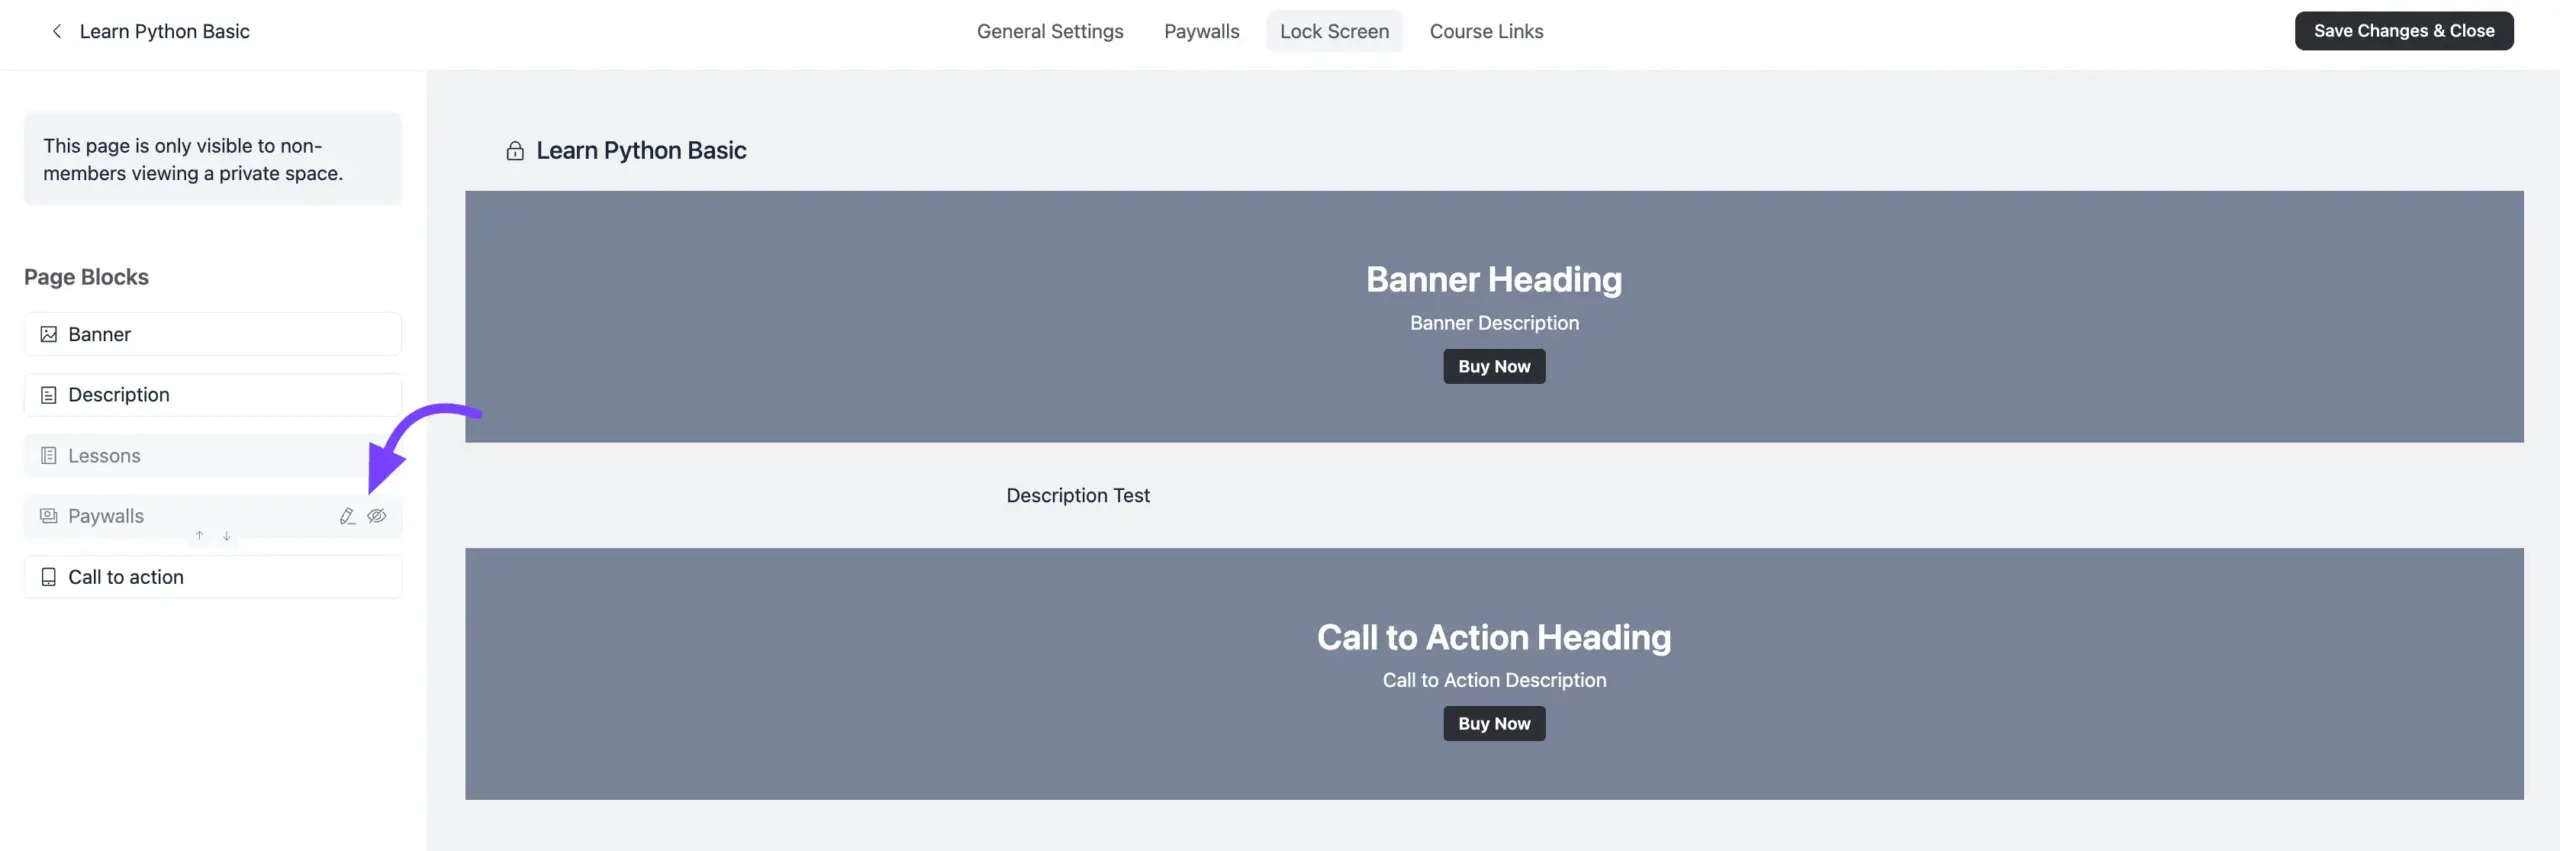
- Customize your paywall: Click the Pencil icon on the Paywall block to edit its content and design.
- Content tab: Add or edit the description that appears with your product.
- Design tab: Change the Button Label (e.g., from "Buy Now" to "Join" or "Enroll Today"), choose to show or hide the paywall description, and change the colors for the block's Background Color, Text Color, Button Label color, and Button Background.
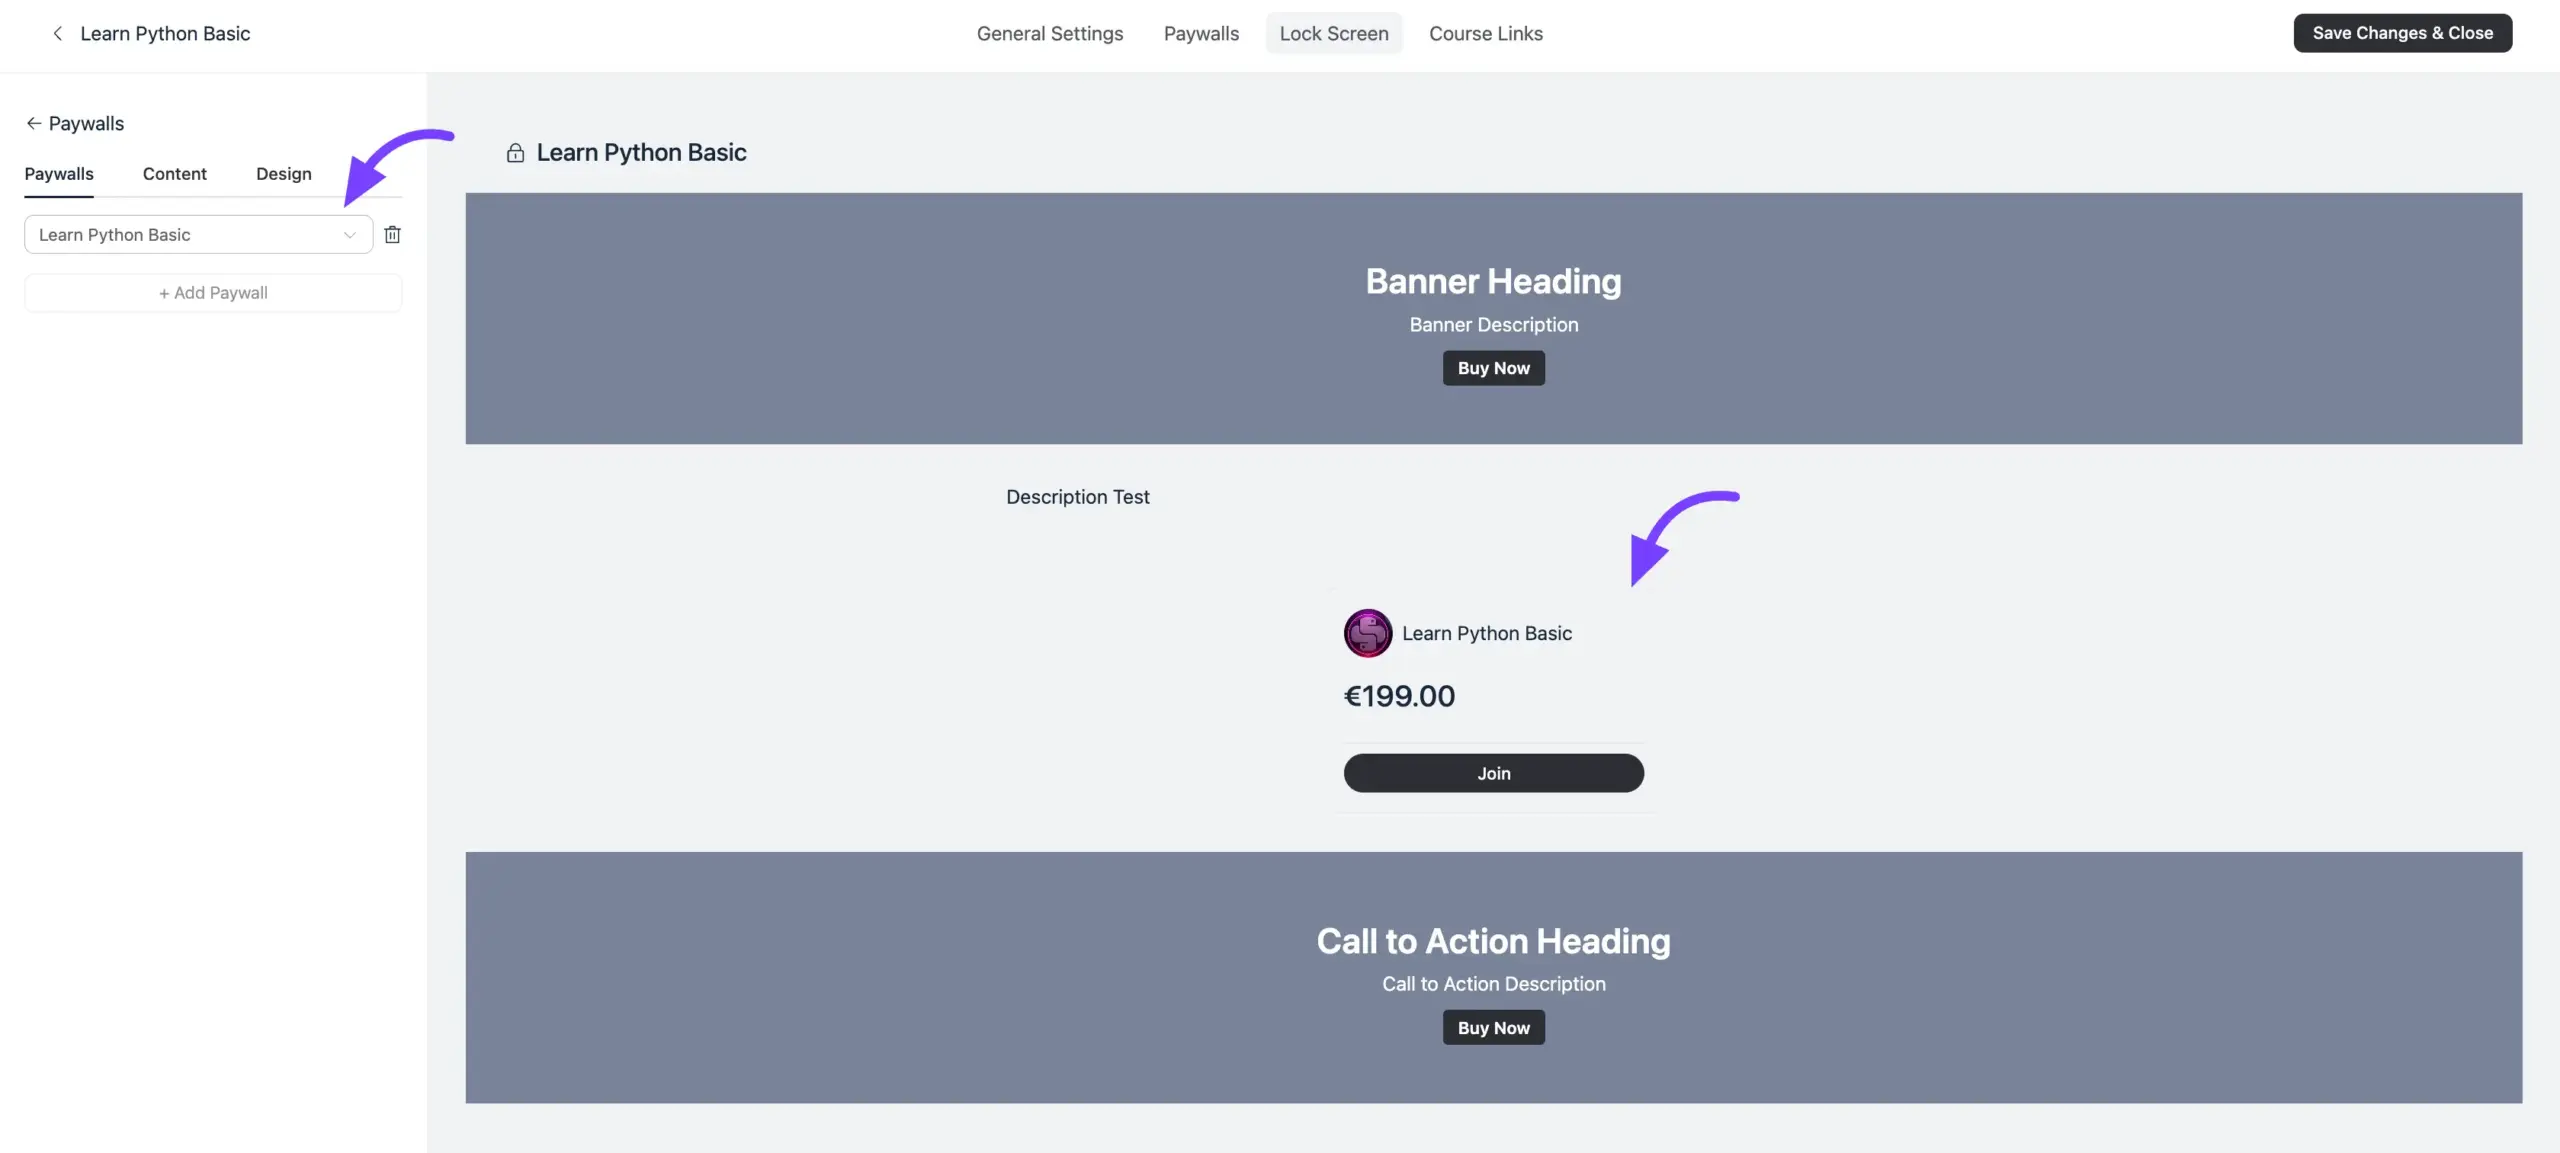
When you are finished designing your sales page, click Save Changes & Close.
Advanced Customization in FluentCart
Your setup is complete. However, if you are a power user, you can access even more settings for the integration.
- Go back to the Paywalls tab in your Course/Space settings.
- Click the ⋮ (three-dot) menu next to your product and select Edit Product.
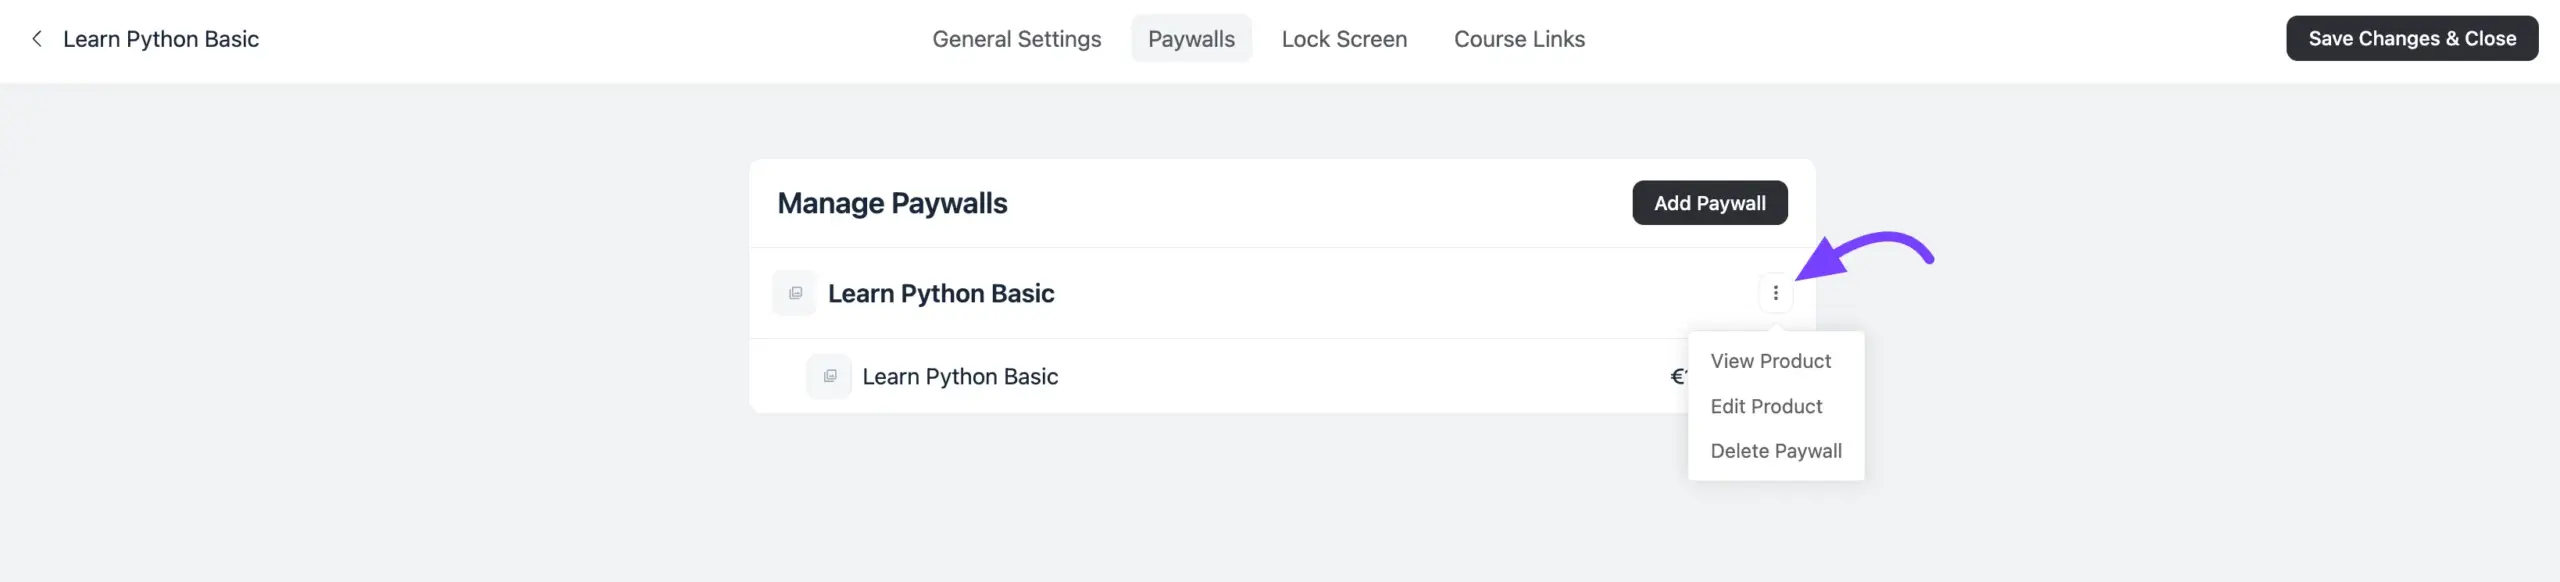
- This takes you directly to the product's edit page inside FluentCart. Click the Integrations tab.
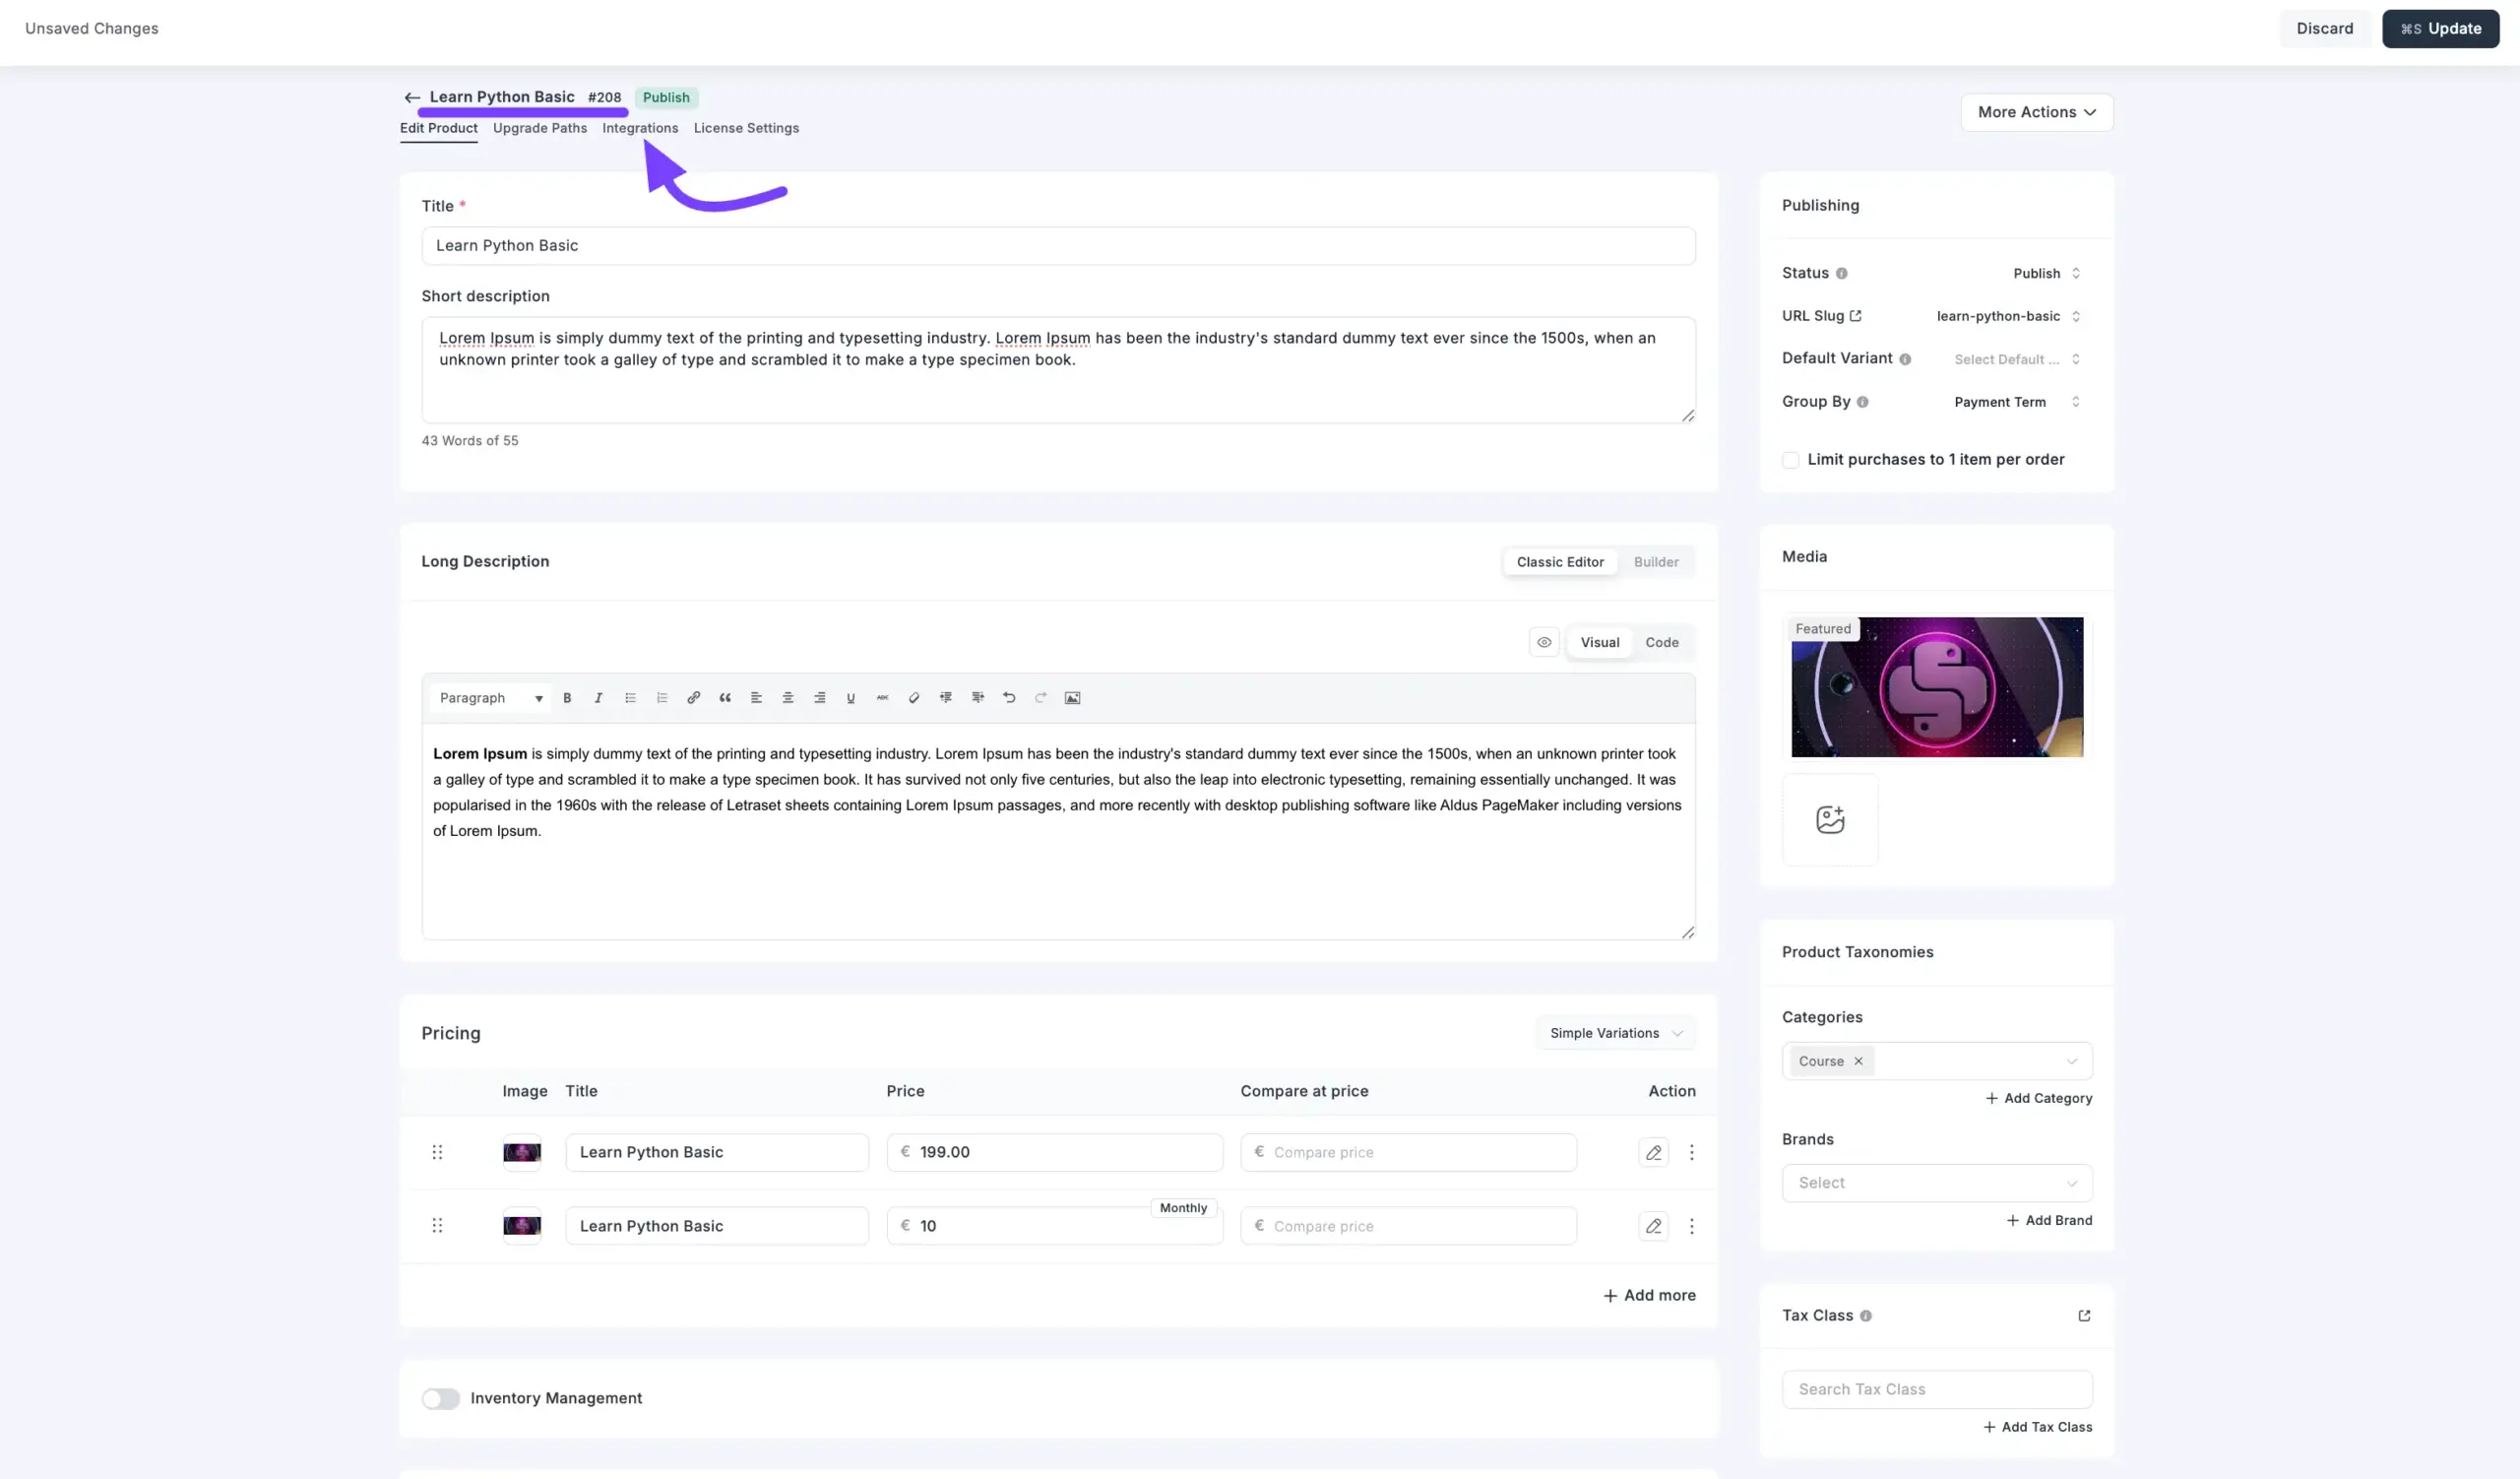
- You will see the FluentCommunity Integration that was automatically created for you. Click the edit icon (a small pencil) to open its settings.
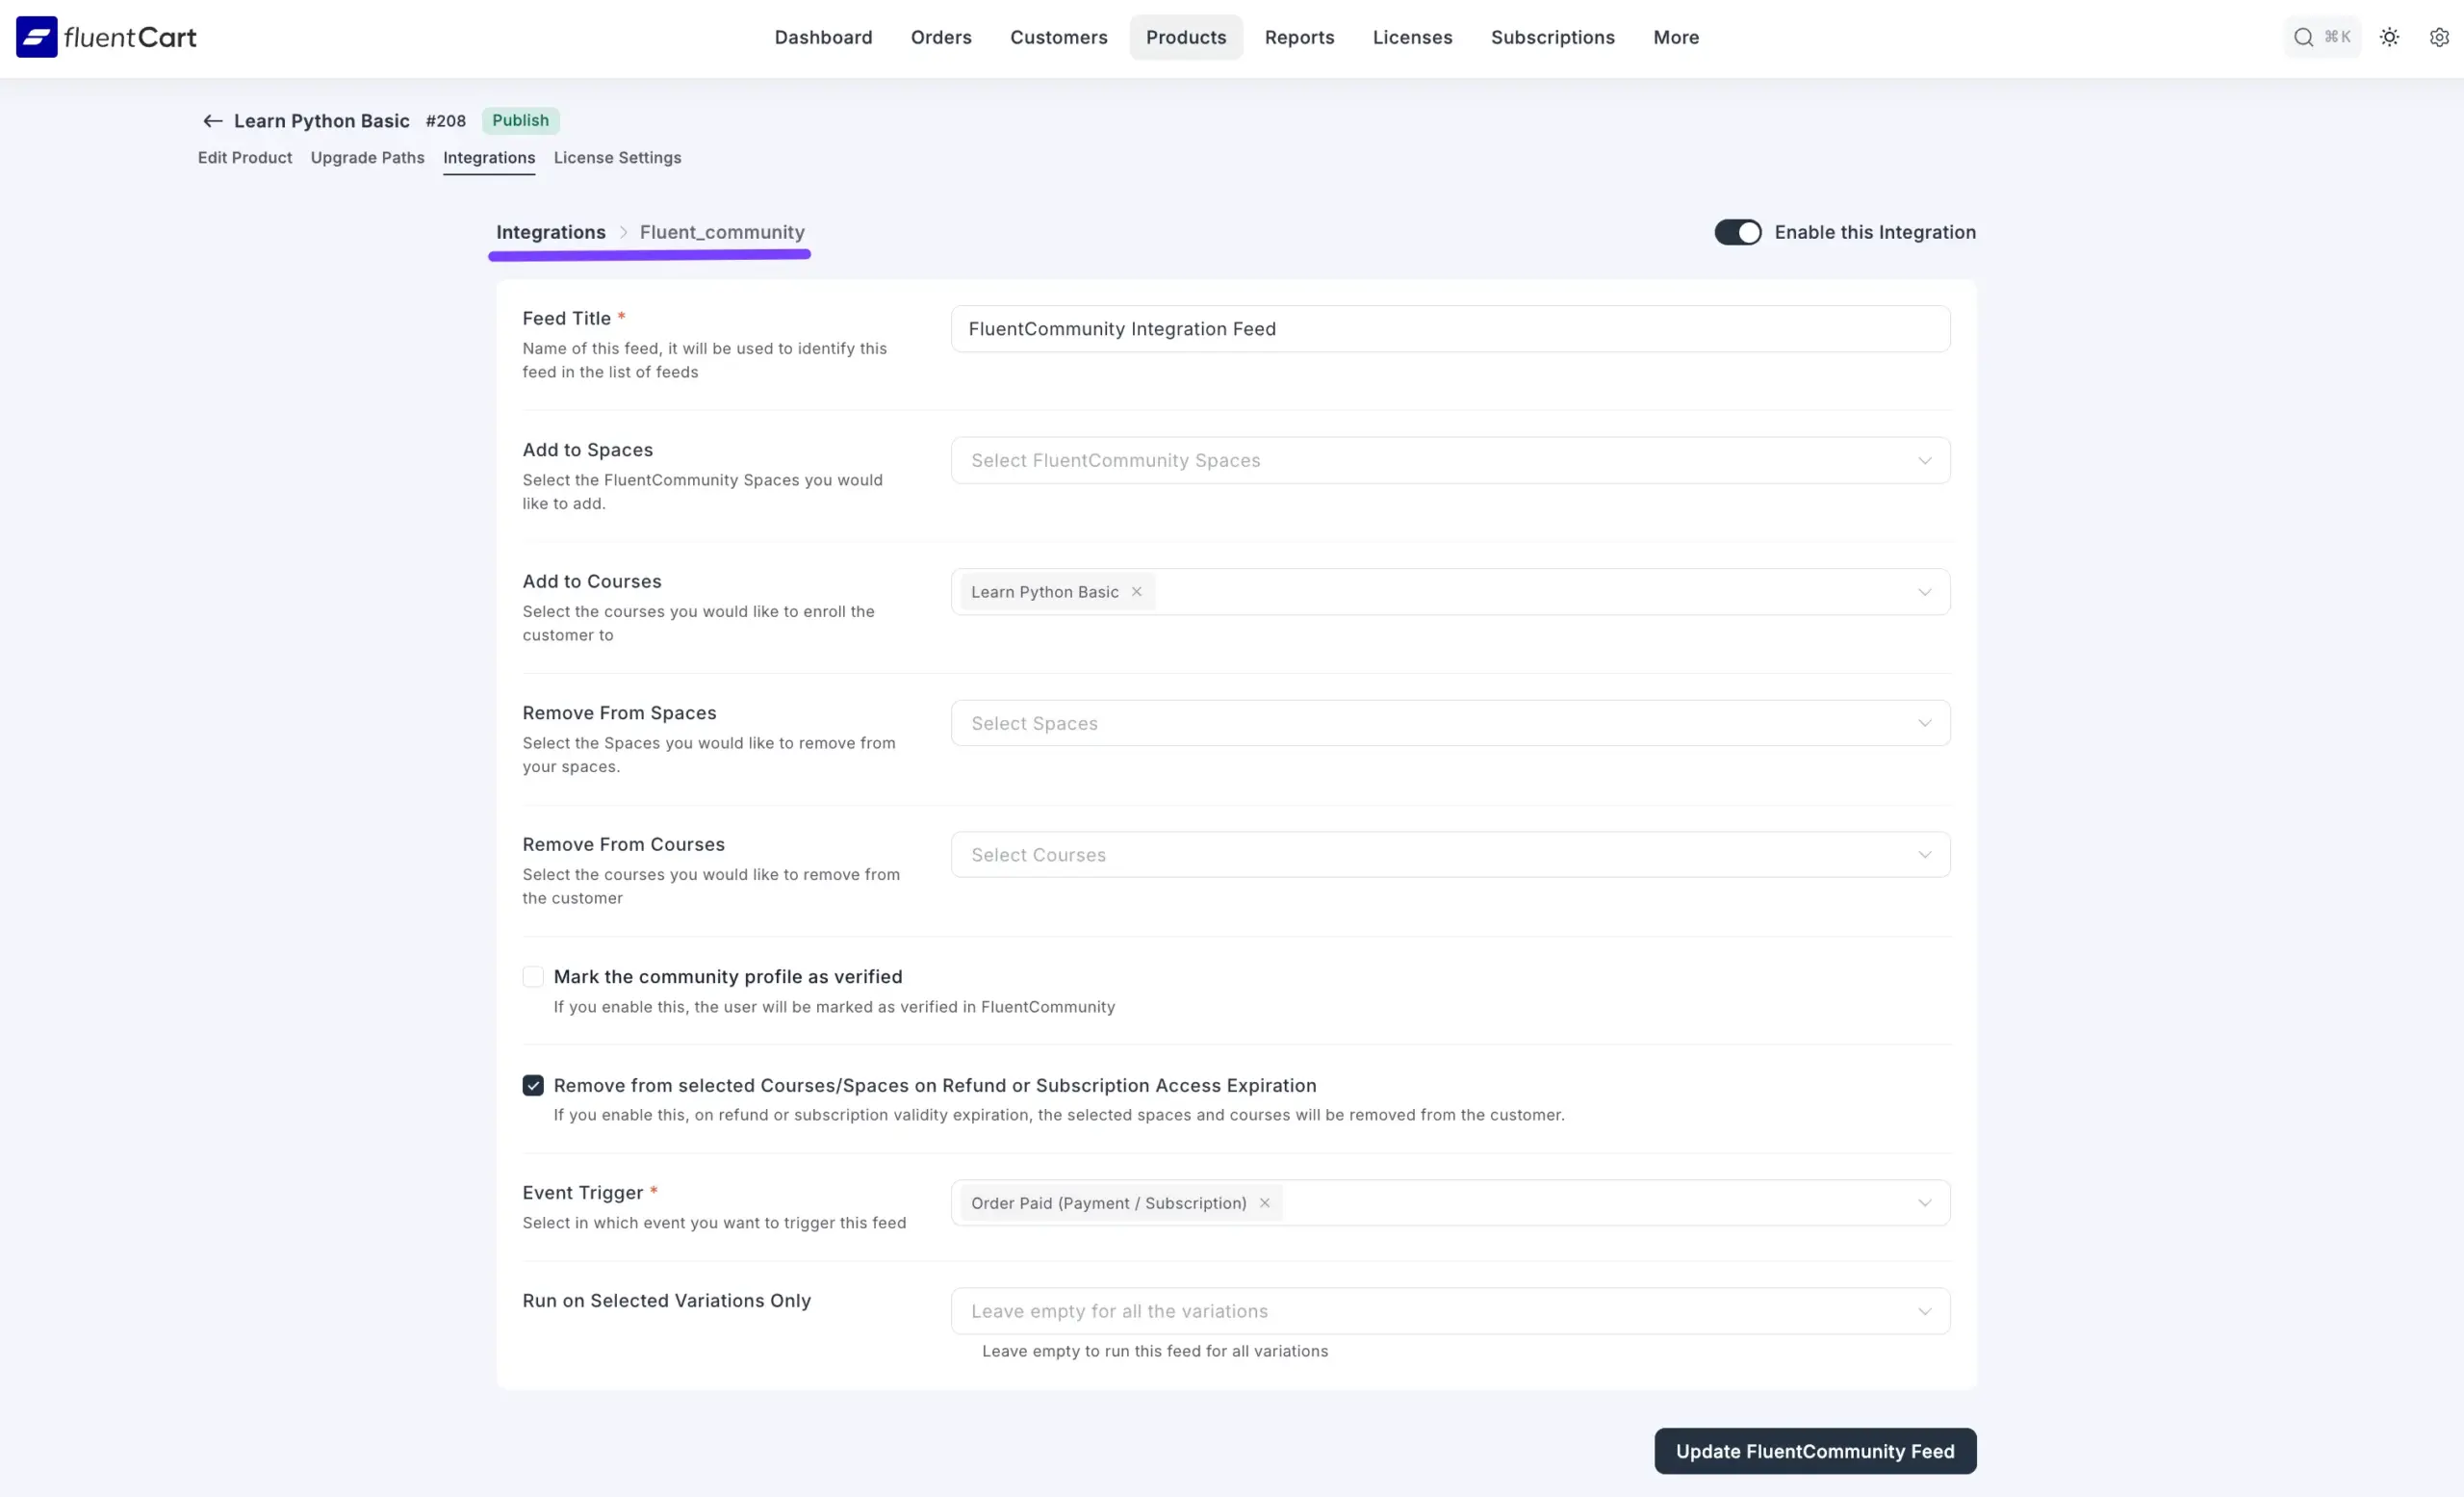
From here, you can add advanced rules, such as:
- Add to Spaces/Courses: Automatically add the buyer to other Spaces or Courses when they buy this one.
- Remove from Spaces/Courses: Automatically remove the user from the content if they get a refund or their subscription expires.
- Mark the community profile as verified: Give your paying customers a "Verified" checkmark on their profile.
- Event Trigger: Change the event that grants access (e.g., from "Order Paid" to "Order Completed").
This advanced panel gives you full, granular control over the e-commerce automation, but for most users, the automatic setup is all you will ever need.