

Appearance
Space Settings & Privacy
Every Space in FluentCommunity is highly customizable. This guide walks you through the General Settings tab, where you control visibility, appearance, and functionality for each Space.
Use Case: You might set an "Announcements" Space to Public with a List layout for clarity, while keeping a "Premium Mastermind" Space Private and monetizing it via the Paywalls tab.
Accessing Space Settings
Space Settings are managed from the community frontend, not the WordPress dashboard.
Navigate to the Space you want to edit.
Click the ⋮ (three-dot) menu in the top-right corner of the Space, next to the Posts, Members, and Chat tabs.
Select Space Settings from the dropdown for customization or editing the space.
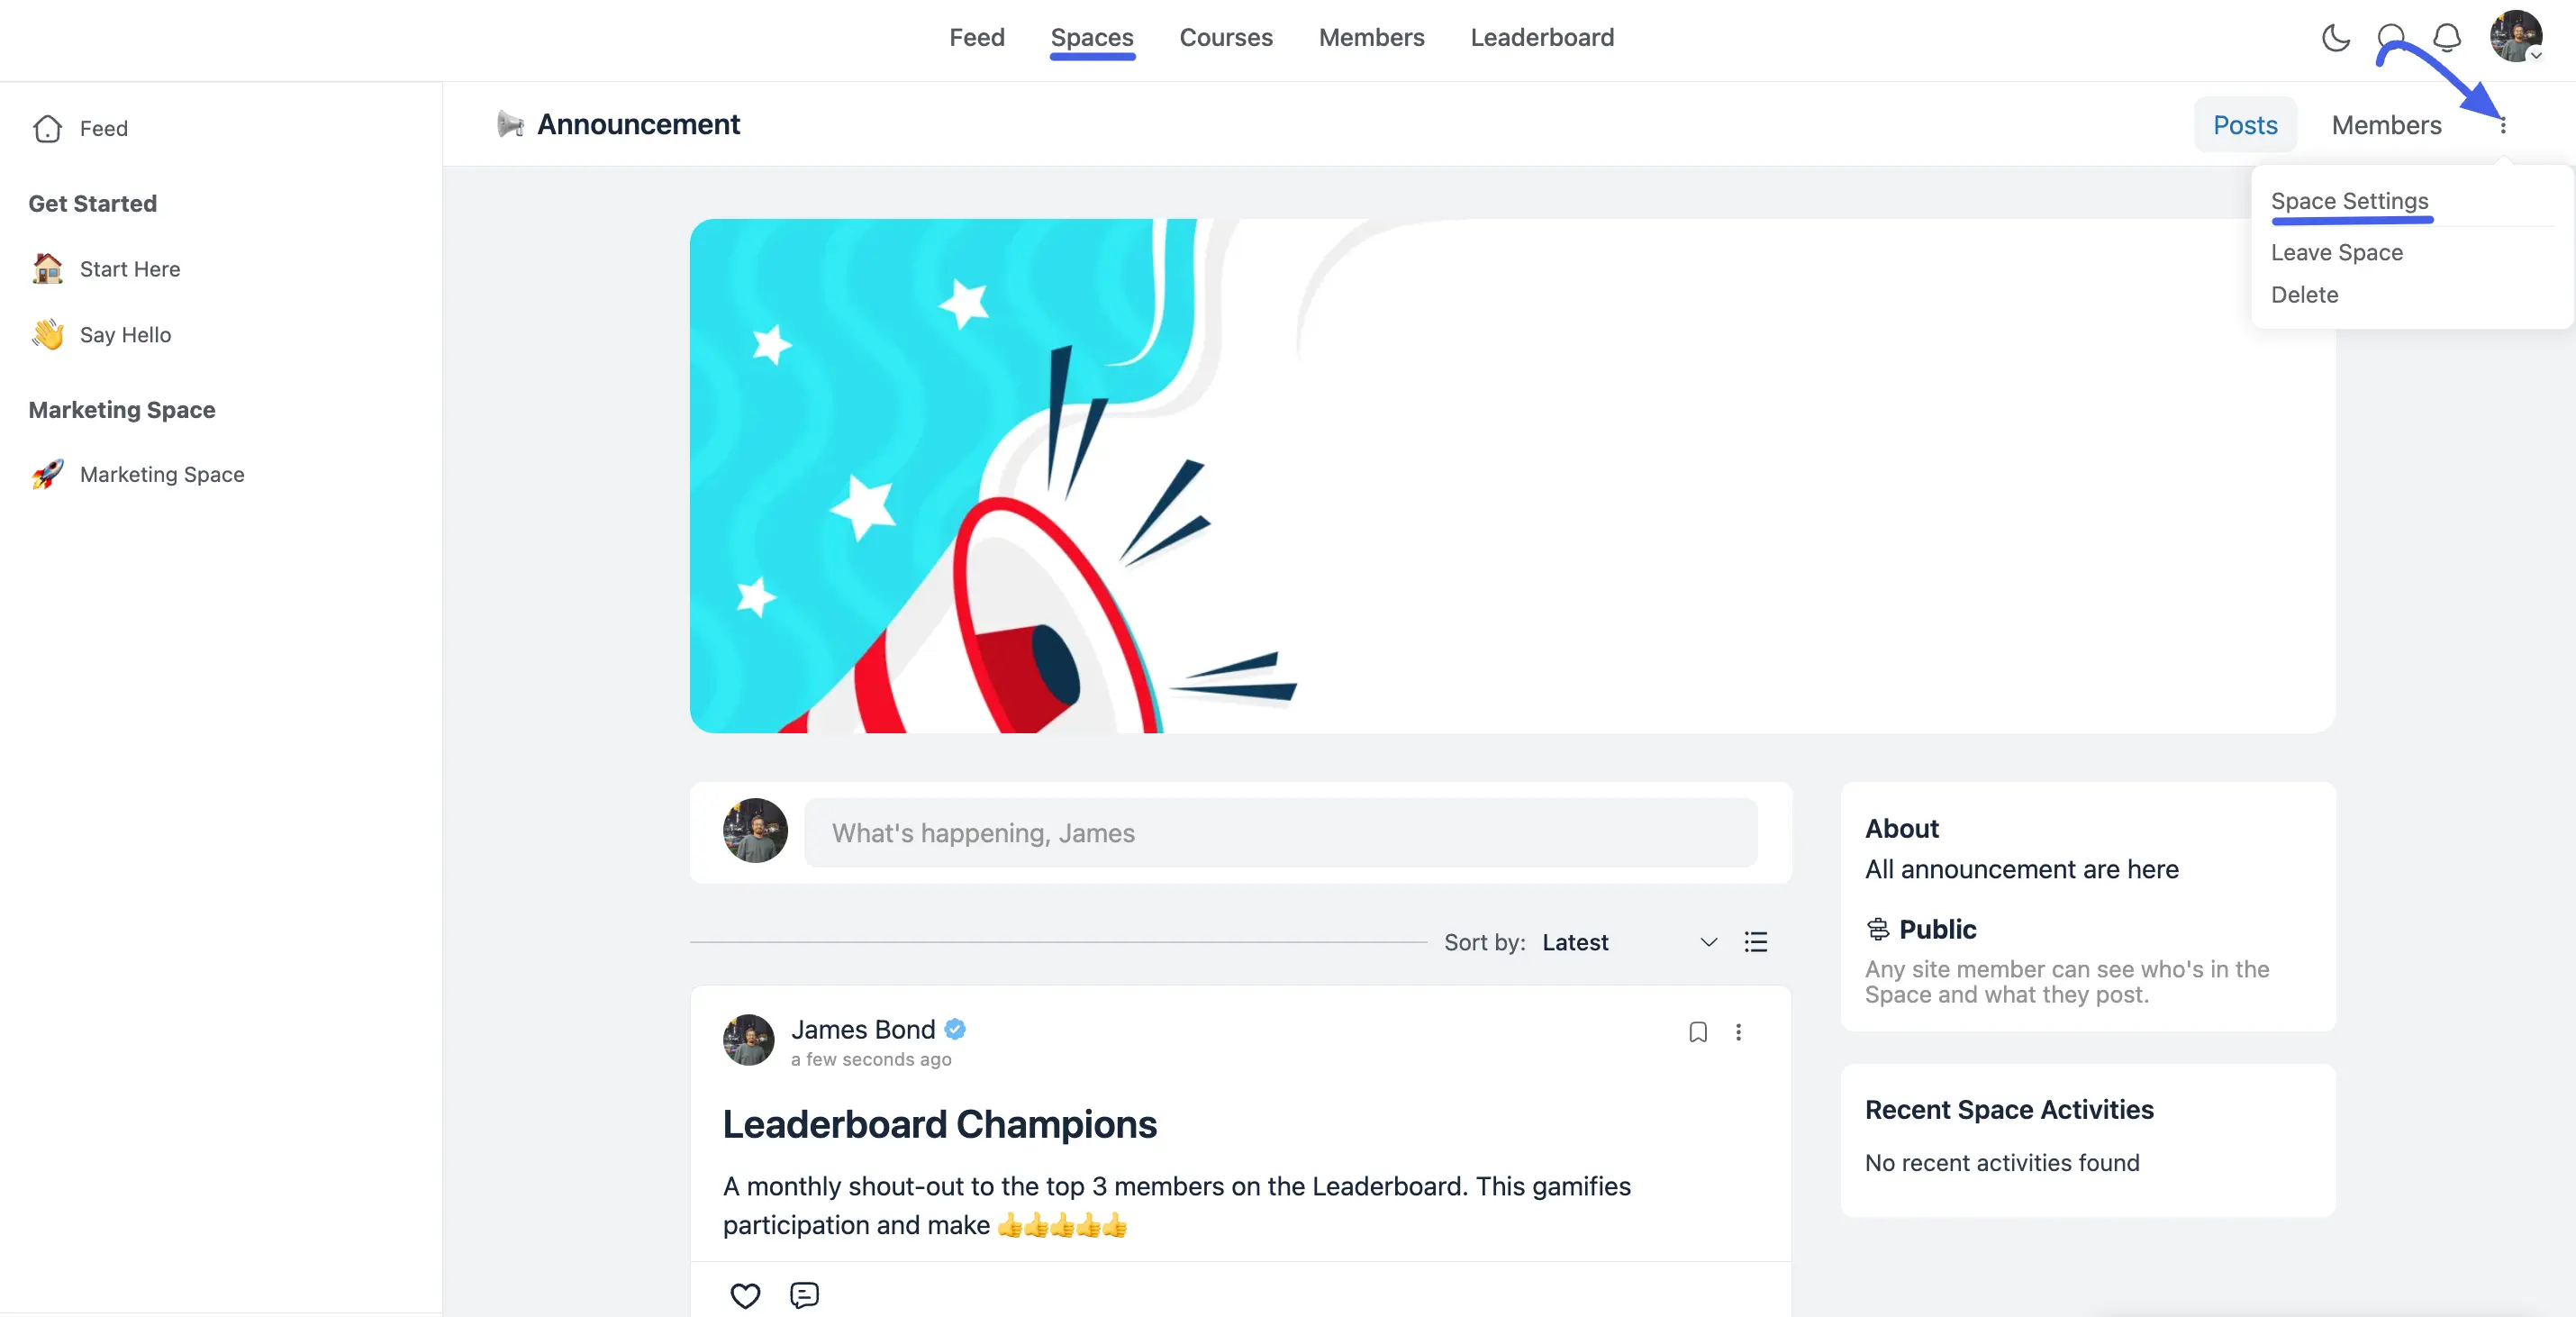
The settings panel opens with four tabs at the top: General Settings, Paywalls, Menu, and Pages (Pro). Click Update info in the top-right to apply any edits.
TIP
Each tab has its own URL, so you can bookmark or share a specific settings screen — for example /space/your-space-slug/settings/general, /settings/paywalls, /settings/lock-screen, /settings/menu, or /settings/pages.
General Settings Tab
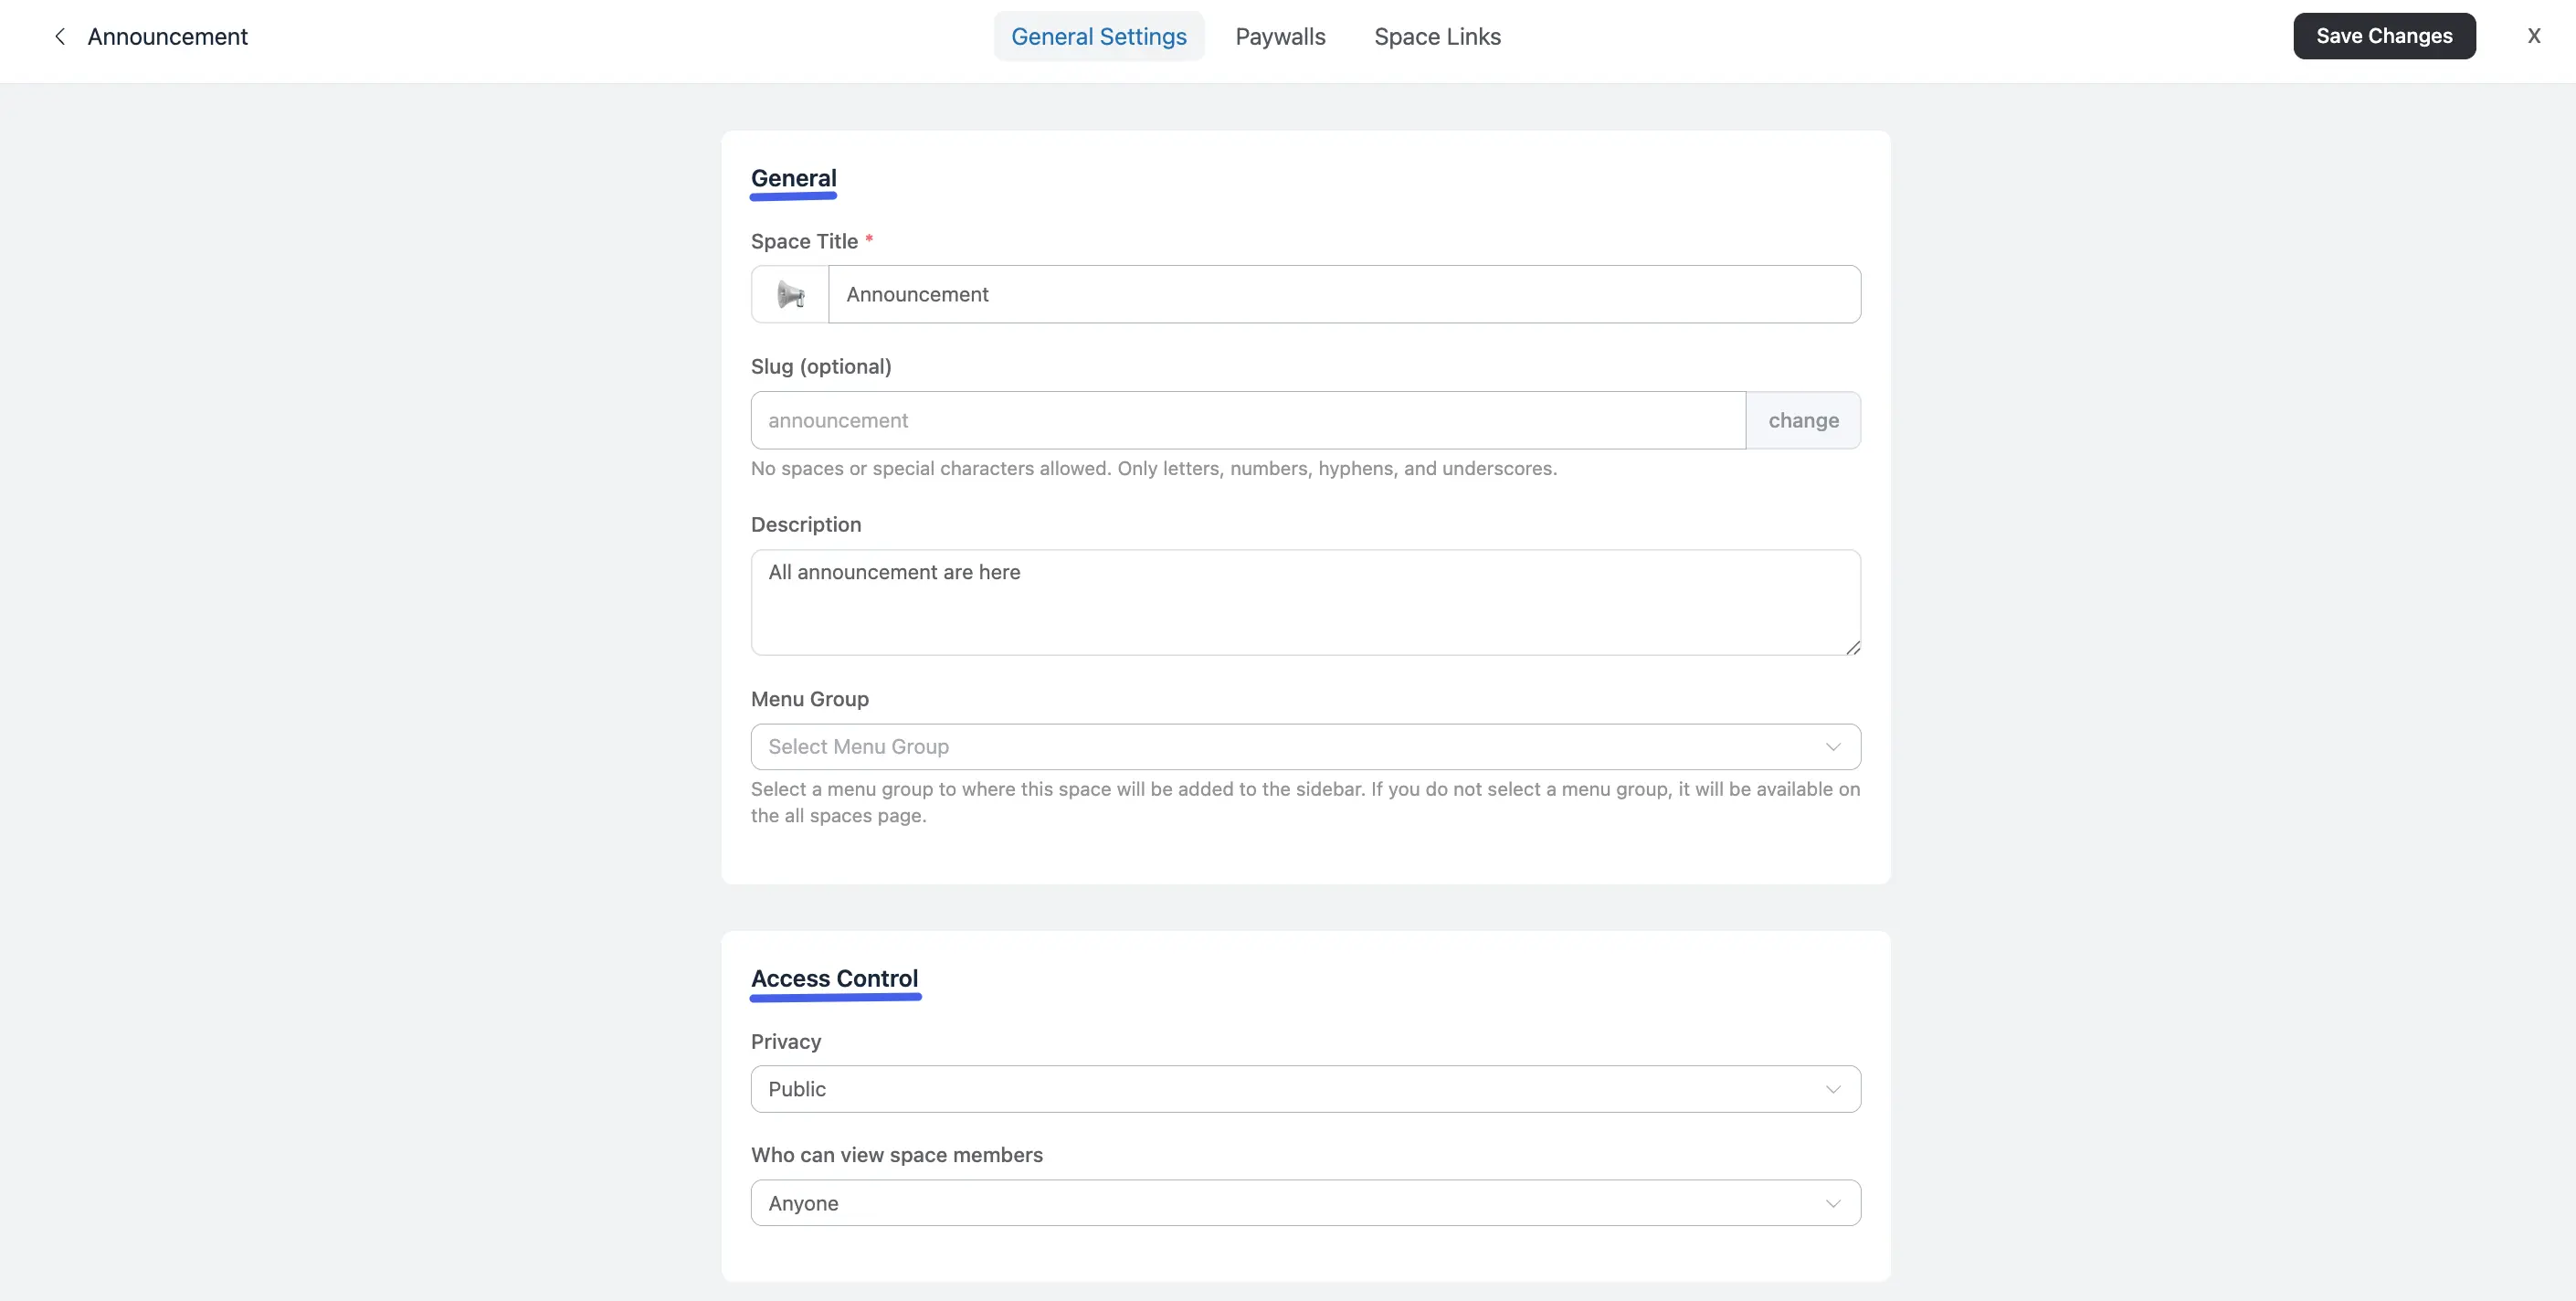
1. General
This section defines the basic identity of your Space.
- Space Title: The name displayed to members. Click the icon on the left to change the Space emoji or image.
- Slug (optional): The URL path for this Space (e.g.,
yourcommunity.com/spaces/announcement). Click change to set a custom slug. Only letters, numbers, hyphens, and underscores are allowed. - Description: A short summary of what the Space is about.
- Menu Group: Assigns this Space to a sidebar navigation group. If no group is selected, the Space appears only on the All Spaces page.
2. Access Control
Controls who can find and join this Space.
Privacy
- Public: Visible to everyone. Any site member can see the Space content and who's in it.
- Private: The Space appears in the directory, but only members can see its content. Non-members see a Lock Screen. Required for using Paywalls.
- Secret: Completely hidden from non-members. Accessible only via direct link or invitation.
When Private is selected, a Lock Screen Type option appears:
- Custom: Build a custom lock screen or sales page using the drag-and-drop builder.
- Default: Show the standard community lock screen.
- Redirect to a URL: Send non-members to an external page (e.g., a sales or landing page).
Allow users to request to join this Space: When enabled, non-members can submit a join request. Admins and Moderators approve or reject requests from the Space's Members tab.
Show Paywalls in Default Lock Screen: When using the Default Lock Screen, check this to display paywall content to non-members.
Who can view space members: Controls who can see the member list for this Space. Options: Member Only, Admin/Moderator Only, Any Logged-in User, or Anyone.
3. Features Customizations
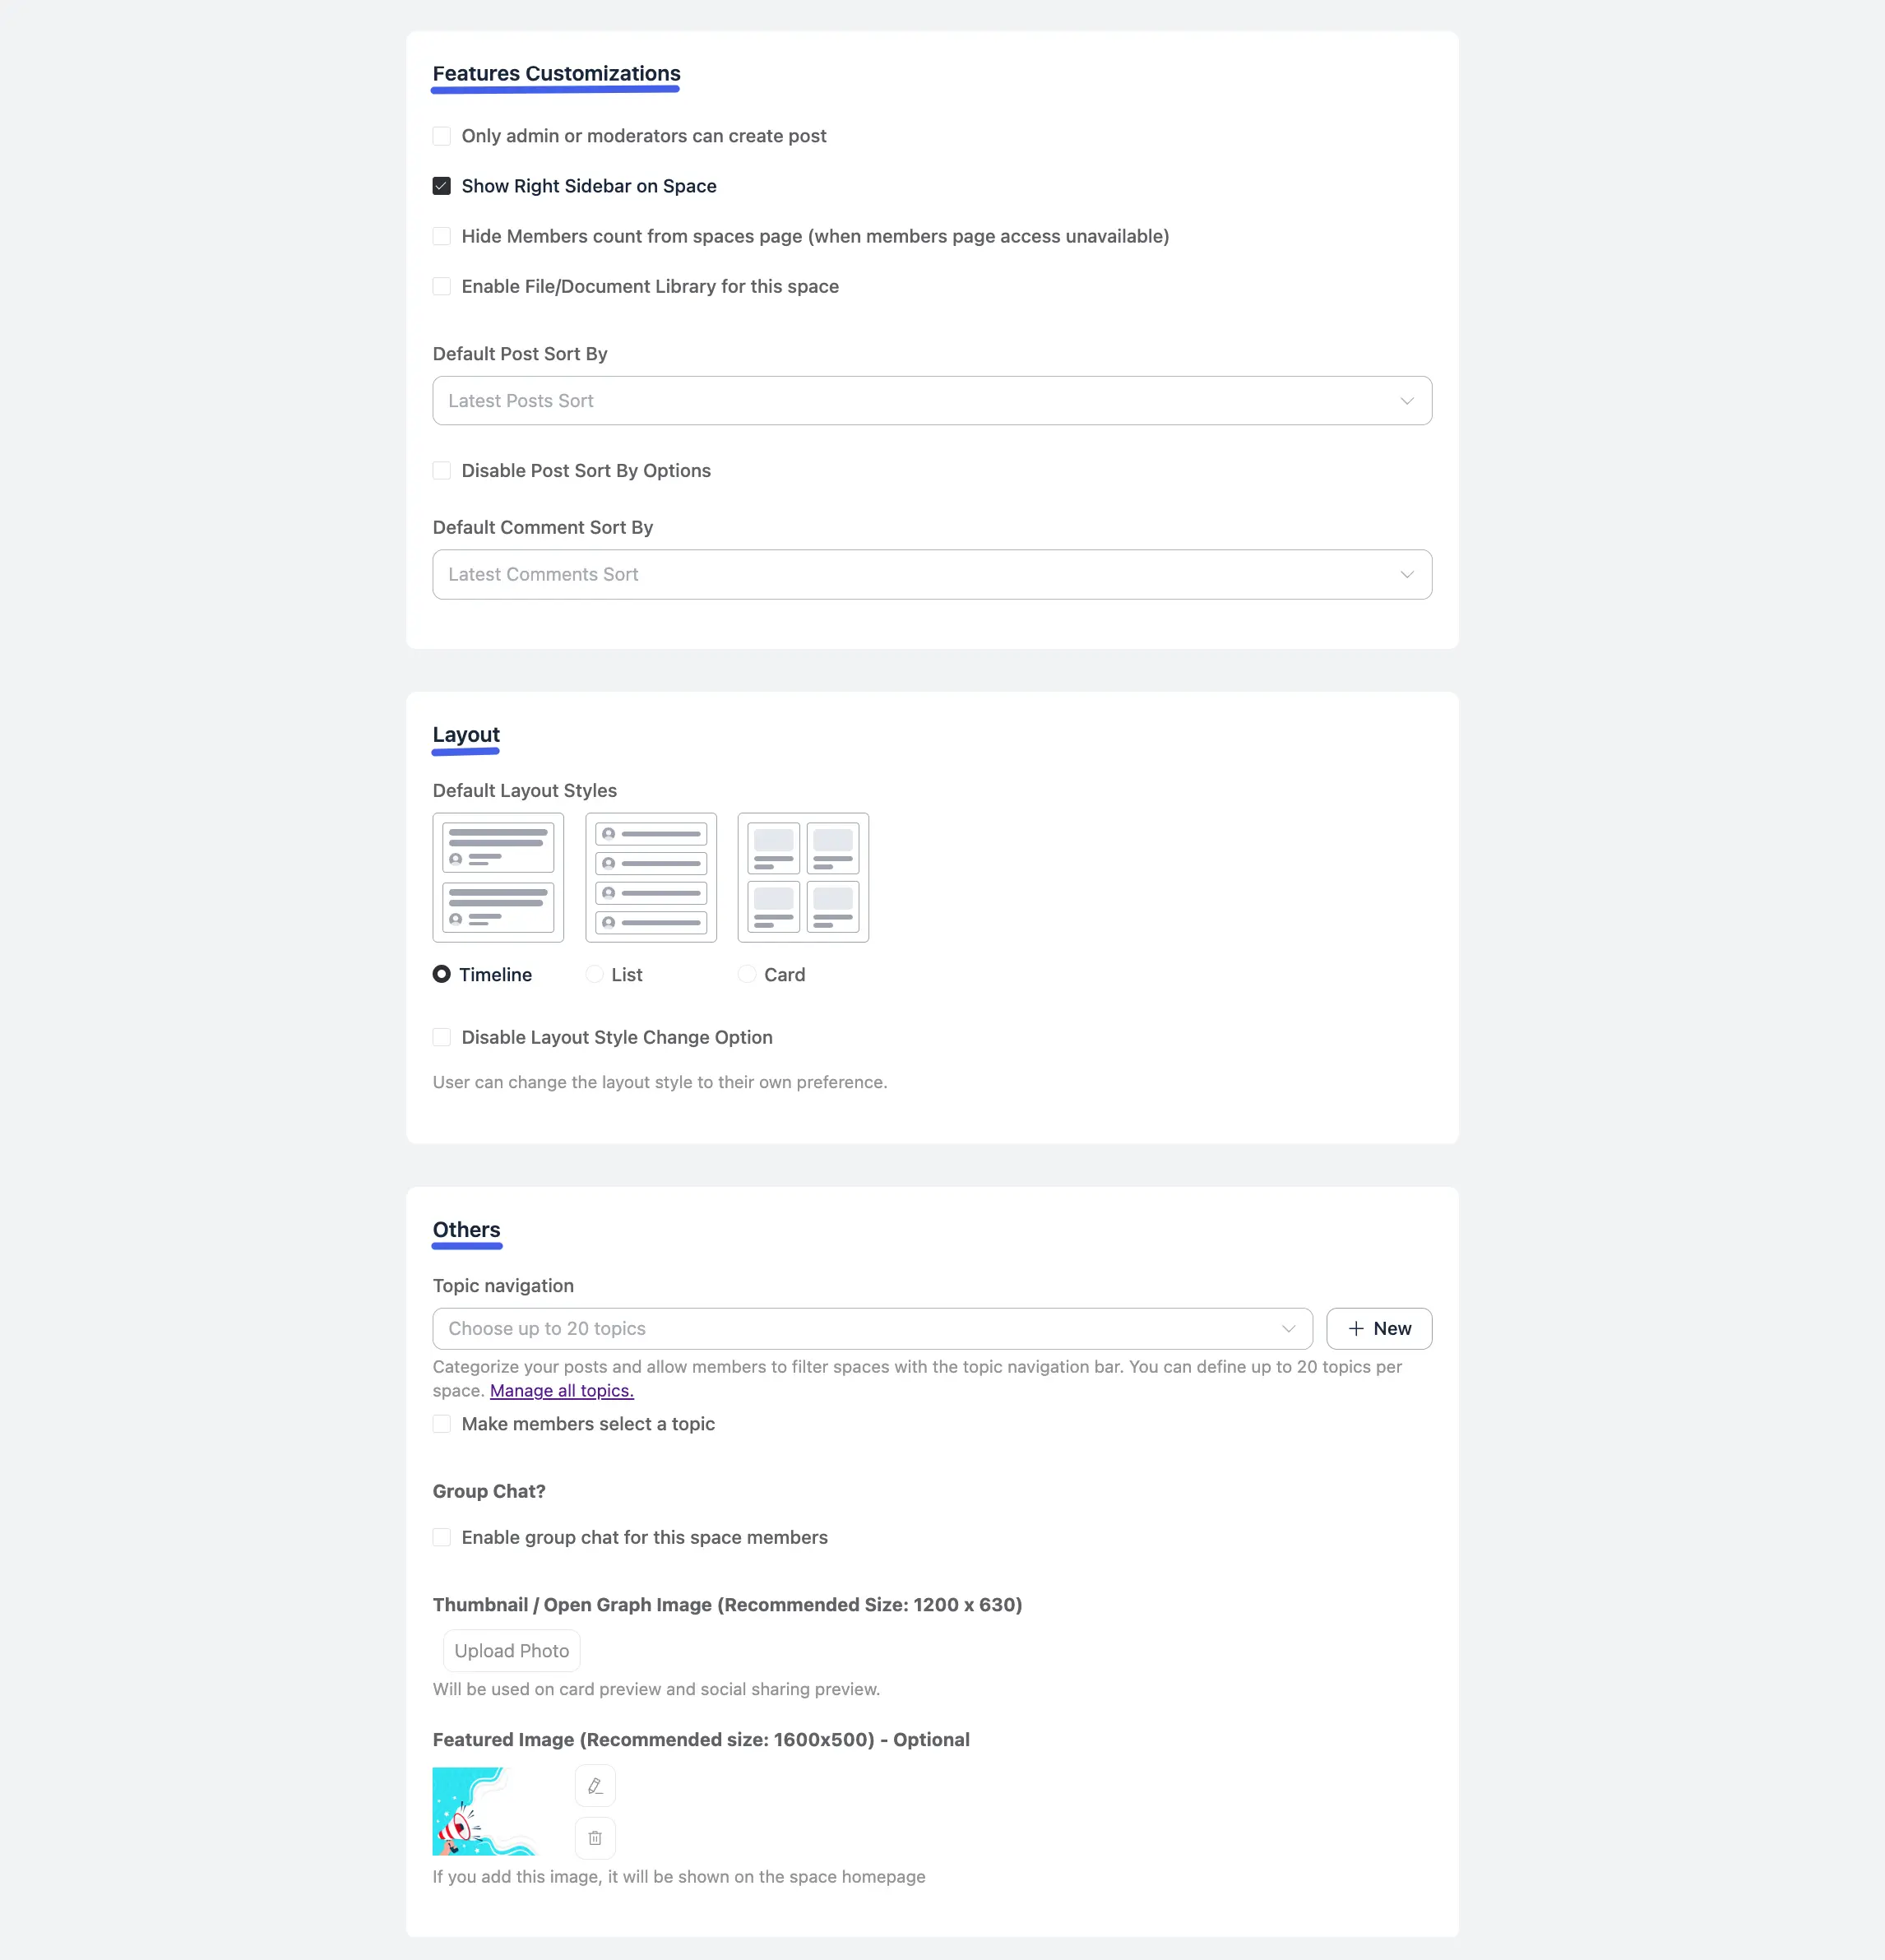
Controls posting permissions, sidebar visibility, and document management.
- Only admin or moderators can create post: Turns the Space into an announcement-style channel. Regular members can read and comment, but cannot create new posts.
- Show Right Sidebar on Space: Enabled by default. Displays the "About" and "Recent Activities" widgets inside the Space.
- Hide Members count from spaces page (when members page access unavailable): Hides the member count from the Space card in the All Spaces directory.
- Enable File/Document Library for this space: Adds a dedicated Files tab to the Space. When enabled, two additional options appear:
- Document Library Access (View & Download): Choose who can view and download files — Members of this space, Any Logged in users, or Public.
- Who can upload the documents?: Choose between Any Members or Admin/Moderators Only.
Default Post Sort By: Sets the default order for posts when members load the Space (e.g., Latest Posts Sort).
- Disable Post Sort By Options: Locks the sort order and prevents members from changing it.
Default Comment Sort By: Sets the default order for comments within posts (e.g., Latest Comments Sort).
4. Layout
Controls how posts are displayed in this Space.
Default Layout Styles: Choose one of three display options:
- Timeline — a standard chronological feed.
- List — a compact, text-focused view.
- Card — a grid of visual cards, ideal for image-heavy content.
Disable Layout Style Change Option: Check this to prevent members from switching to a different layout themselves.
5. Others
Topic Navigation: Categorize posts within your Space. Select up to 20 topics — members can then filter the Space feed by topic. Click + New to create a topic directly from this window, or click Manage all topics to manage them centrally.
- Make members select a topic: Requires members to choose a topic before creating a new post.
Group Chat: Check Enable group chat for this space members to create a dedicated real-time chat room for all Space members.
Thumbnail / Open Graph Image (Recommended Size: 1200×630): Used on the All Spaces card preview and when the Space URL is shared on social media.
Featured Image (Recommended size: 1600×500) — Optional: Shown as a banner at the top of the Space homepage. If no image is added, no banner appears.
Paywalls Tab
Visible when the Space privacy is set to Private. Use this tab to link FluentCart products to charge for Space access, allowing you to monetize physical products, digital downloads, and courses. Once a product is added, return to the Lock Screen settings to design your sales page.
Menu Tab
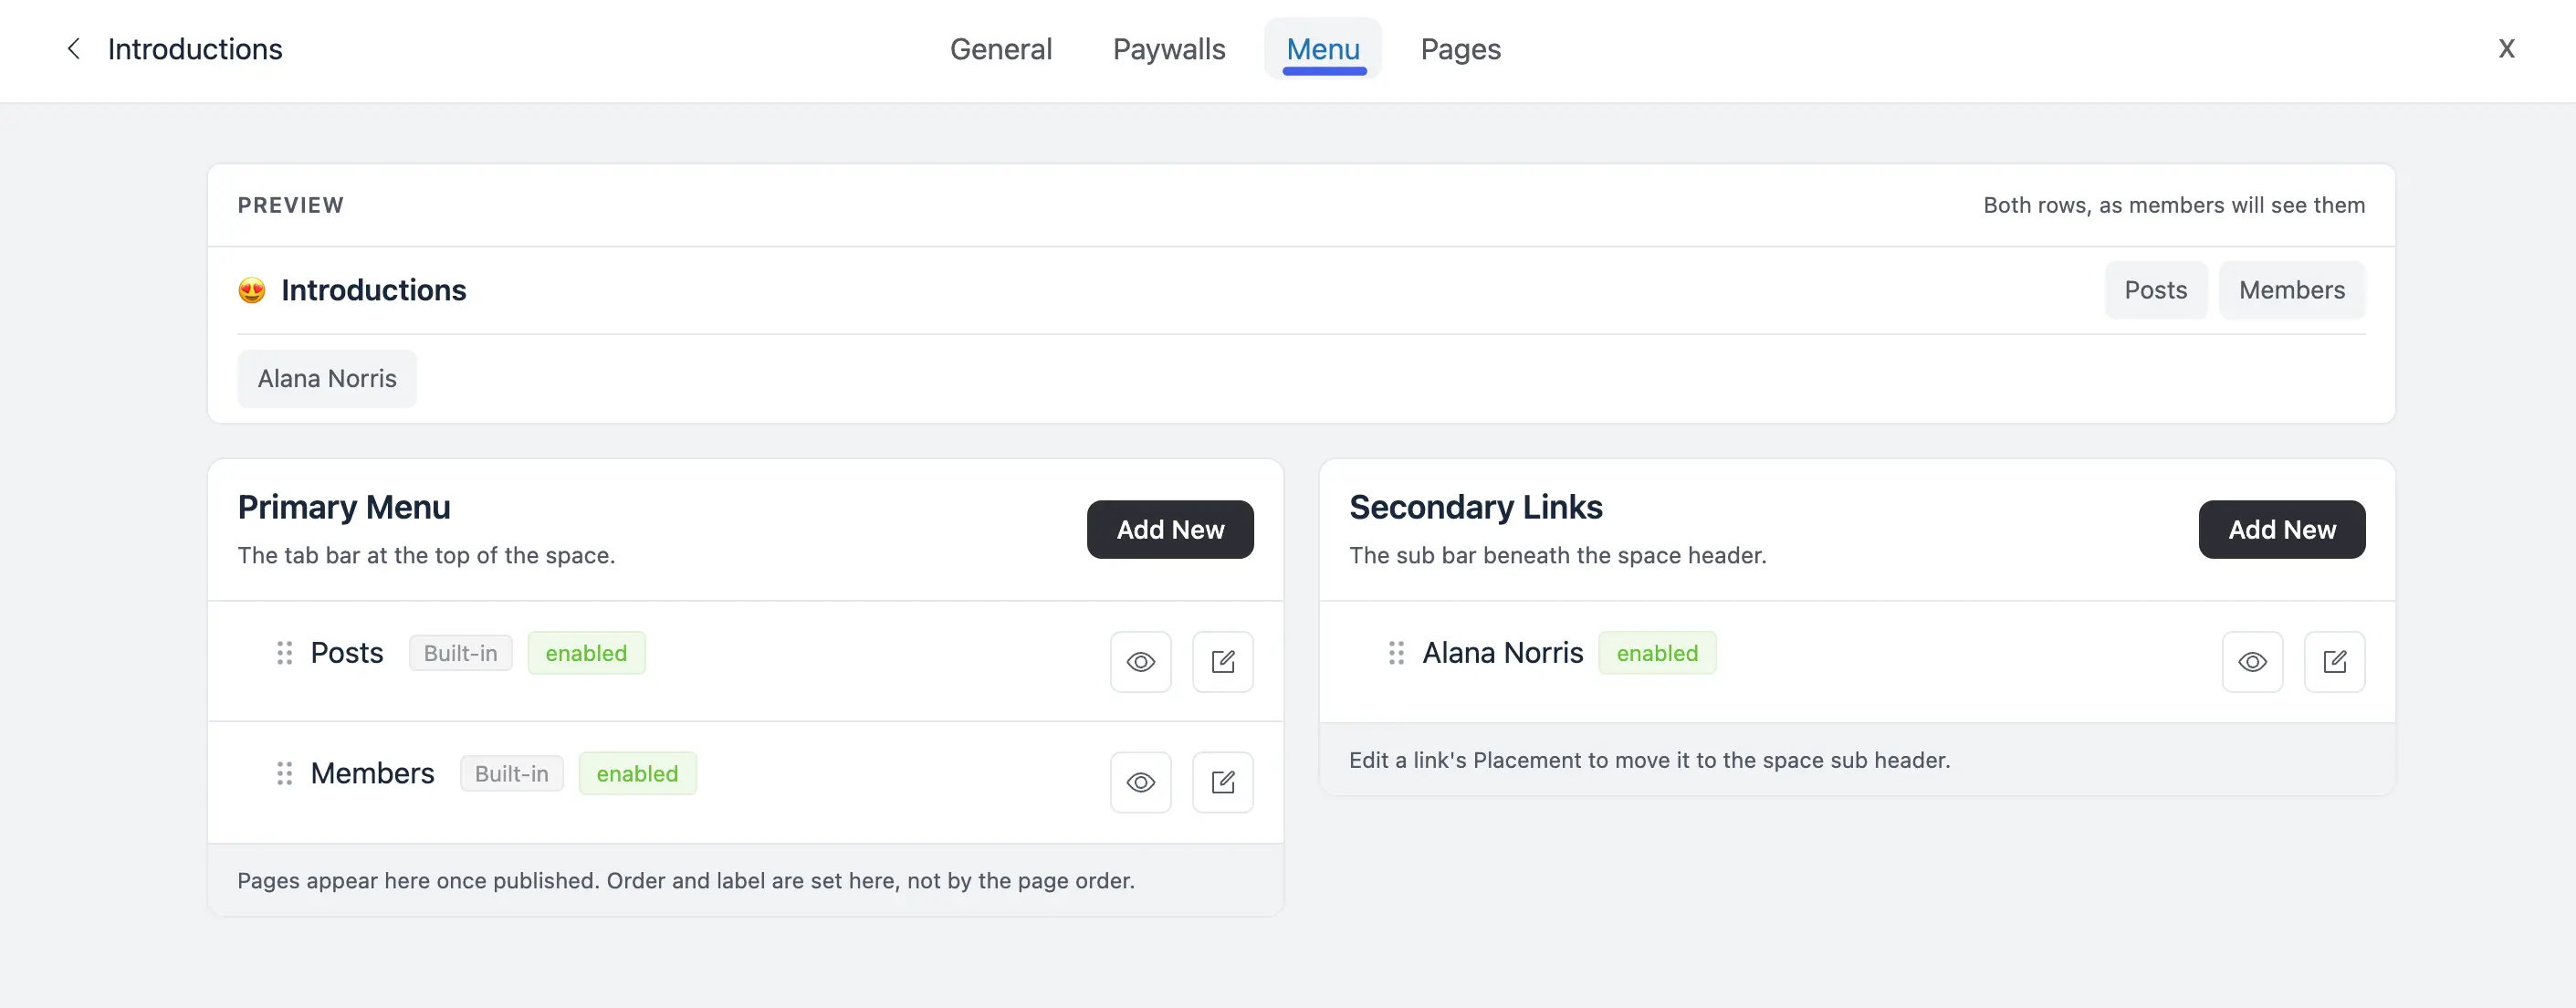
Use this tab to control the Space's navigation reorder, rename, hide, and add tabs and links in the Primary Menu (the tab bar) and Secondary Links (the sub bar), with a live preview of both rows.
See Space Menu Manager for the full guide.
Pages Tab (Pro)
Use this tab to create and manage static pages that live inside the Space — a Guidelines page, an FAQ, or a Current Offers page. Each page is written in the block editor, can be limited to Space members, and can appear as a tab in the Space's navigation next to Posts and Members. Pages you're still working on stay as drafts that only Space Admins and Moderators can see.
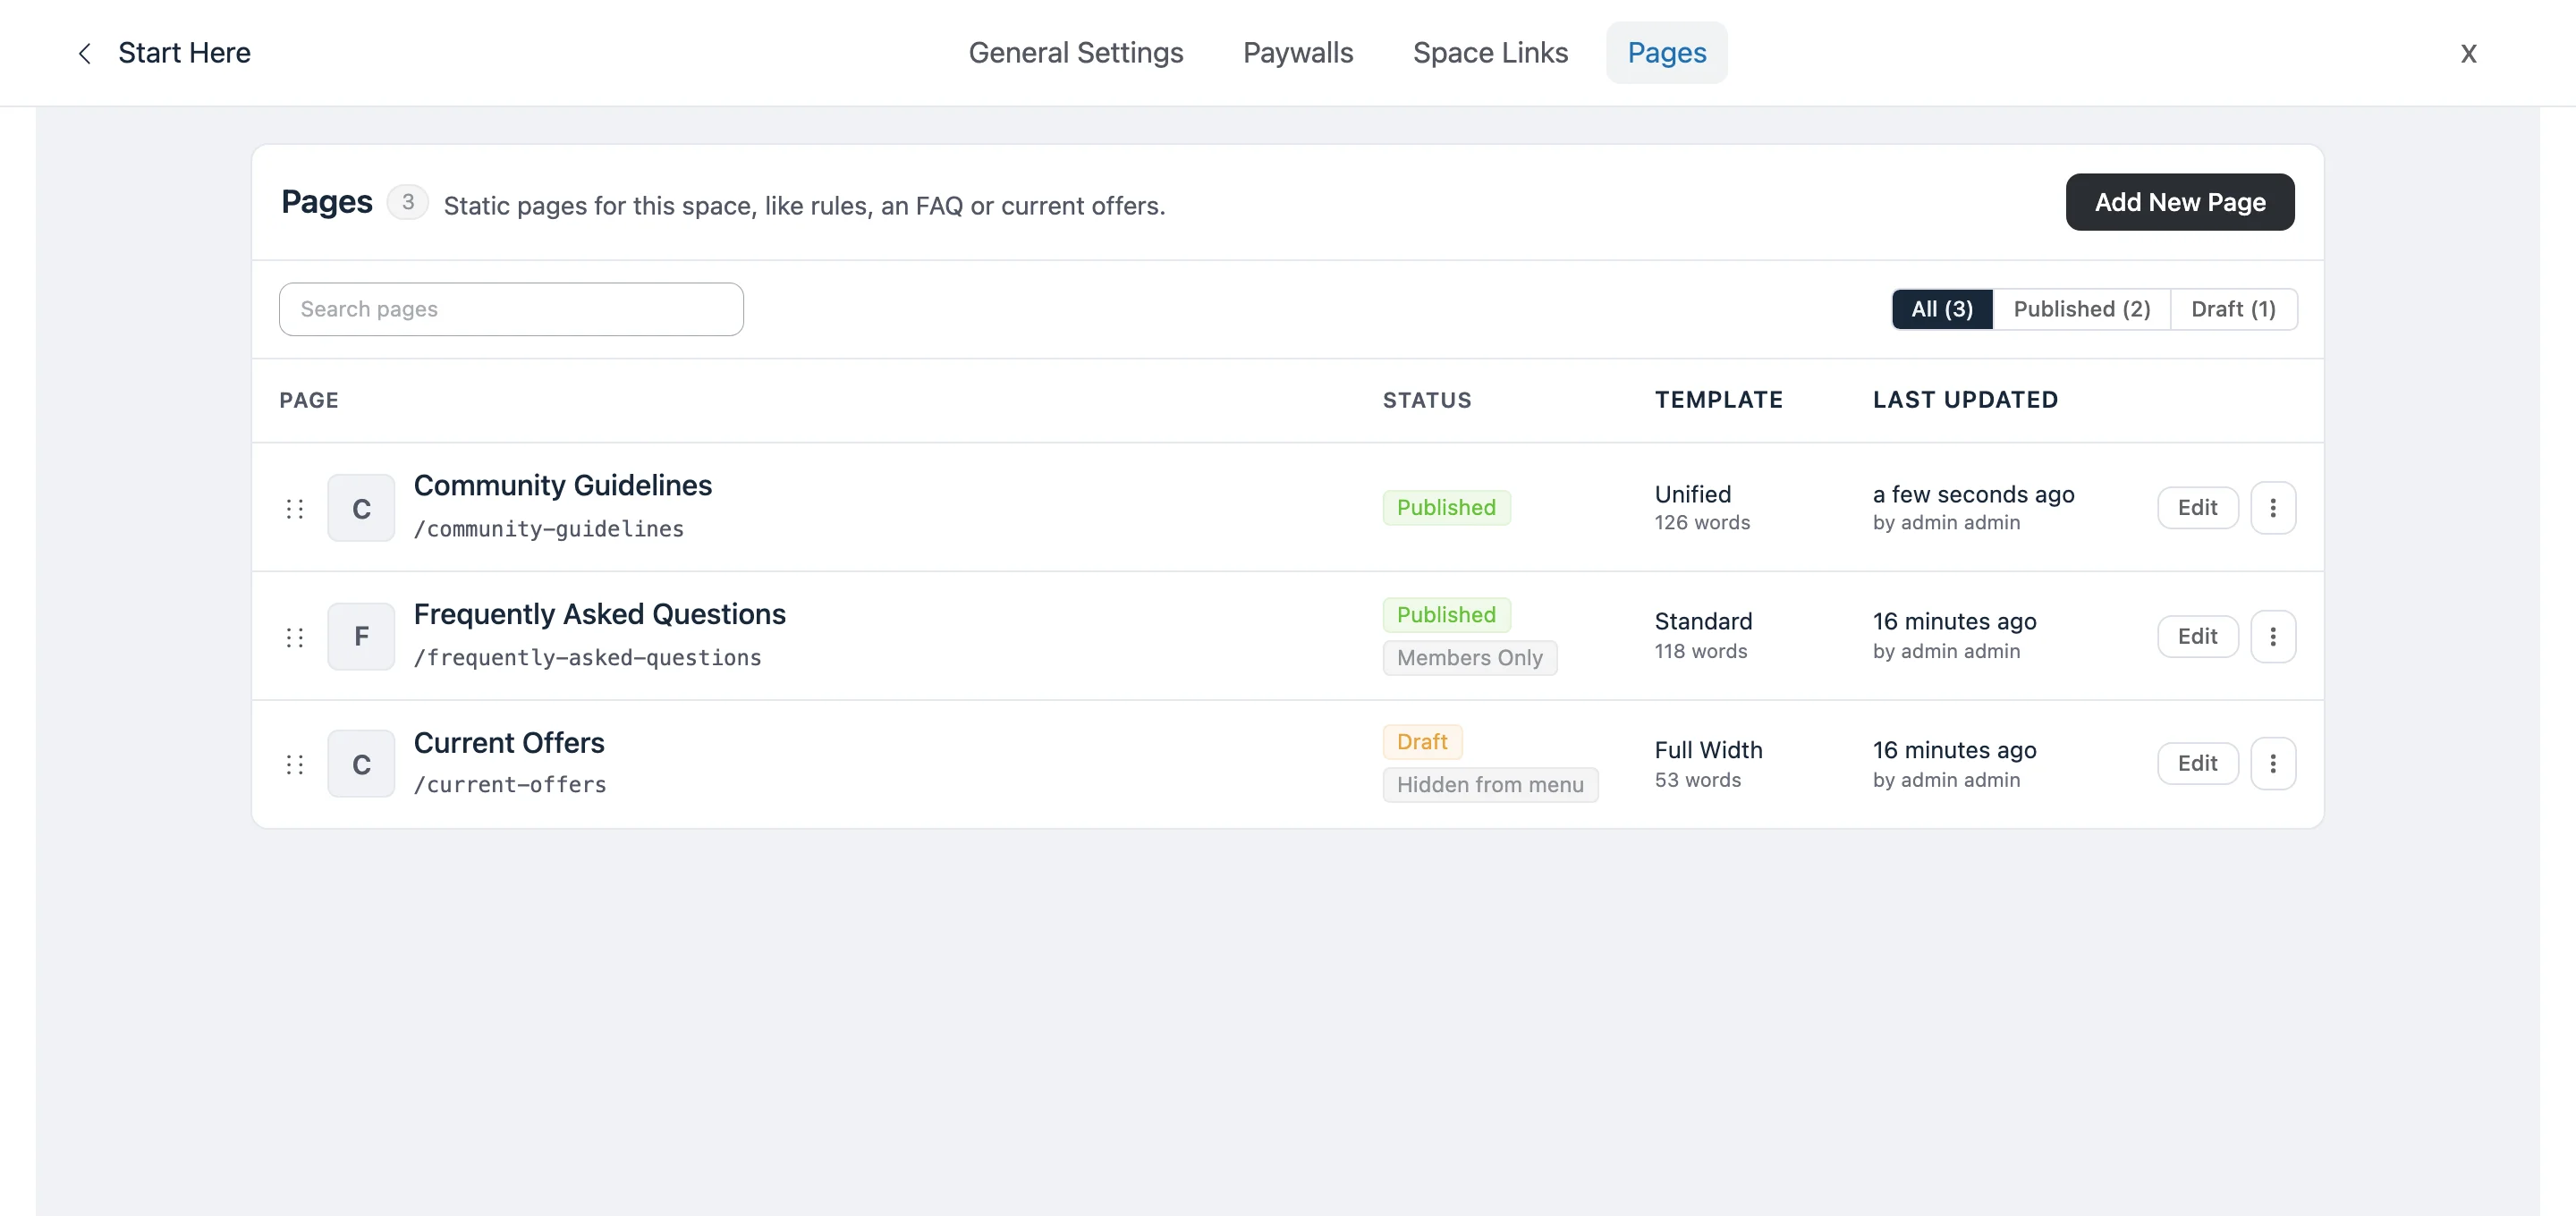
See Space Pages (Pro) for the full guide.
Deleting a Space
Deleting a Space is done from the same ⋮ (three-dot) menu you use to open Space Settings — not from inside the settings panel.
- Navigate to the Space you want to remove.
- Click the ⋮ (three-dot) menu in the top-right corner.
- Select Delete from the dropdown.
- Confirm your choice in the pop-up that appears.
This cannot be undone
Deleting a Space is permanent. Its posts, comments, and member list go with it — so export anything you need first.